
Ensuring that your web applications work flawlessly across different browsers has become paramount. This is where Cypress comes into play. That end-to-end testing framework has gained popularity thanks to its simplicity, real-time feedback, and robust testing capabilities. Follow this guide to learn how to set up a Cypress TypeScript project and make your test scripts even more reliable.
We will start from scratch and walk you through the process of creating a Cypress project and integrating it with TypeScript. Let’s dive in!

What Is Cypress?
Cypress is a JavaScript-based framework for end-to-end and component testing. This open-source technology is built for the modern web. In detail, it is designed to simplify and streamline the process of writing, running, and debugging tests for web applications. If you are familiar with these technologies, it is something like Playwright.
Cypress provides a testing API that makes it easier to write cross-browser tests in both JavaScript and TypeScript. Write test scripts once and execute them on Chrome, Safari, Edge, Opera, Firefox, and many other popular browsers!
Why Write Cypress Test Scripts in TypeScript
There are at least three good reasons to use Cypress with TypeScript:
- Greater robustness thanks to type safety: Types reduce the chance of introducing subtle bugs into your tests, making them less flaky and more robust. This leads to higher reliability, as tests are less likely to fail due to issues in the code such as type mismatches.
- Improved code maintainability: TypeScript enhances code readability and maintainability by providing a better coding experience than JavaScript. Plus, auto-completion and type inference offered by modern IDEs make it easier to write and understand test code. As your test suite grows, maintaining a clear and organized codebase becomes crucial.
- Enhanced collaboration and documentation: A strongly typed language like TypeScript encourages a more structured and documented coding style. When multiple team members collaborate on the same tests, type definitions help ensure that everyone understands the expected inputs and outputs for functions and components, reducing errors and communication overhead.
While TypeScript offers several benefits, it also introduces a few challenges. Its learning curve is steeper than JavaScript’s and can make writing tests a bit slower. The main problem, however, is that adding TypeScript to the Cypress test environment requires some initial effort. Avoid that headache with our complete Cypress TypeScript setup guide!
Initializing a Cypress TypeScript Project
Follow this step-by-step tutorial and learn how to create a Cypress project for TypeScript E2E testing.
Step 1: Initialize an npm Project
Open the terminal and create a cypress-typescript-demo folder for your Cypress project:
mkdir cypress-typescript-demoIn a real-world example, give the directory a more appropriate name.
Enter it:
cd cypress-typescript-demoAnd launch the command below to initialize an npm project:
npm init -y Great! Your cypress-typescript-demo folder will now contain a package.json file.
Step 2: Set Up Cypress
Make sure to meet the Cypress system requirements before proceeding.
Now, add Cypress to your project’s dependencies with:
npm install cypress --save-devThe above command will install cypress locally as a dev dependency in the project. It may take a while, so be patient.
Open Cypress with:
npx cypress openThe first time you launch this command, it will start a setup wizard:

Here you can see the new features available in the latest version of Cypress. Click “Continue >” to move on.
In the next view, select the type of testing project you want to initialize:
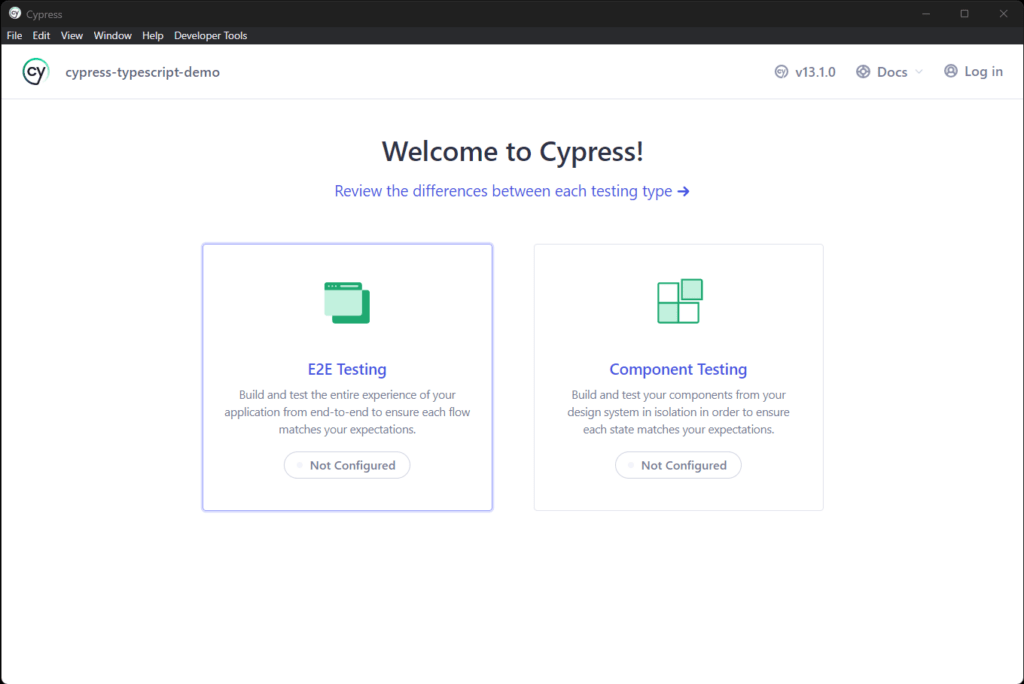
In this example, go for “E2E testing,” which is the most common scenario.
This will initialize the following file structure in the root folder of your project:
├── cypress.config.js
└── cypress
    ├── downloads
    ├── e2e
    ├── fixtures
    └── supportCode language: CSS (css)
You will be notified of that operation by the window below:
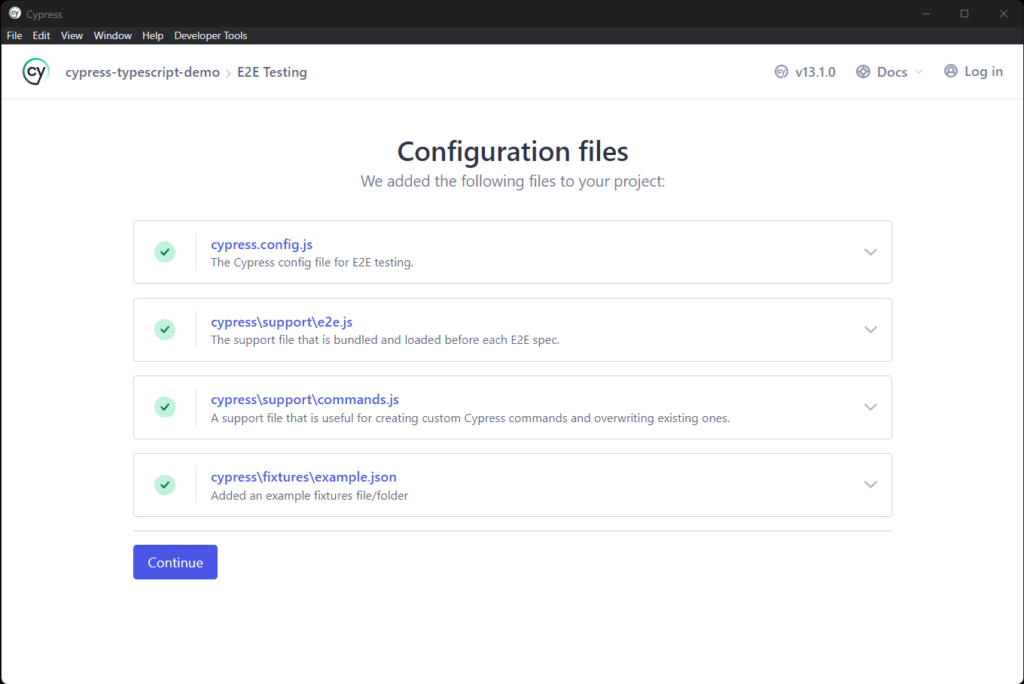
Again, click the “Continue” button.
You will now be asked to select the browser you want to launch your tests on. Ignore that and close all the open windows.
Fantastic! You now have a Cypress project in place. Time to add TypeScript.
Step 3: Configure TypeScript
First, add TypeScript to your project’s dependencies with:
npm install typescript --save-devThis will install typescript locally as a dev dependency in the project.
Nest, initialize a TypeScript configuration file with:
npx tsc --initThat will create a tsconfig.json in the root of your project. Open it and replace its content with:
{
  "compilerOptions": {
    "target": "es5",
    "lib": ["es5", "dom"],
    "types": ["cypress", "node"]
  },
  "include": ["**/*.ts"]
}Code language: JSON / JSON with Comments (json)
target instructs the TypeScript compiler to compile the TS application into an ECMAScript 5 JavaScript application. Instead, "types" tells the compiler to include only Cypress and Node.js type definitions.
Note: You may need to restart your IDE’s TypeScript server after adding tsconfig.json.
Wonderful! You have everything required to write your first Cypress Typescript script.
Step 4: Create Your First Cypress TypeScript Script
Open Cypress again:
npx cypress openChoose “E2E Testing” and reach the browser selection view again:
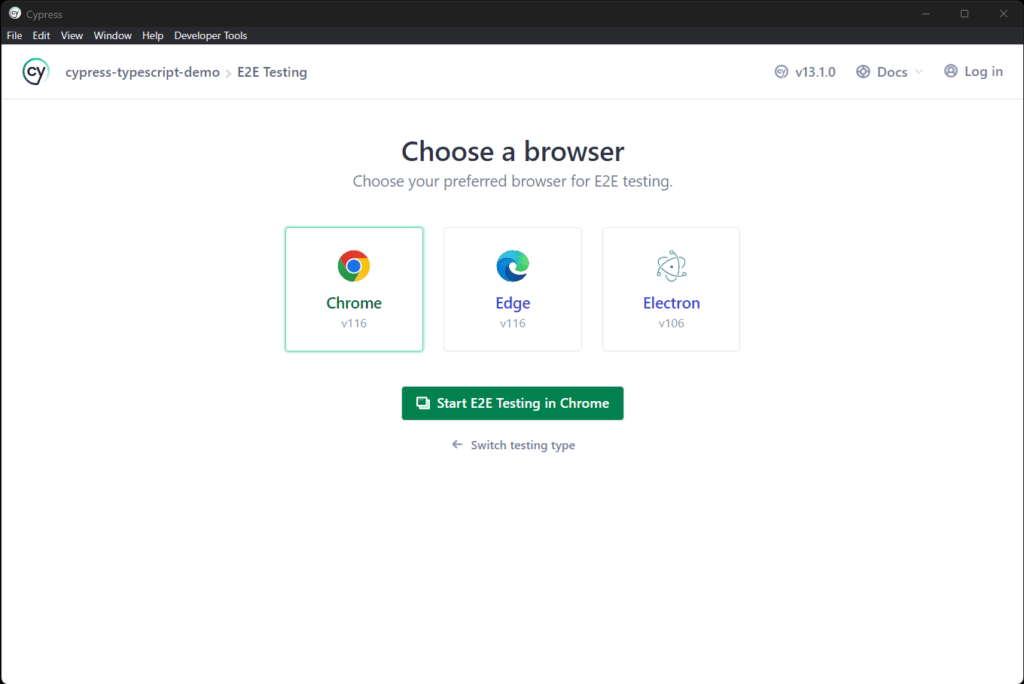
In this example, we are going to choose “Chrome,” but any other browser will do. Click “Start E2E Testing in Chrome.”
This will open the Cypress spec file creation modal:
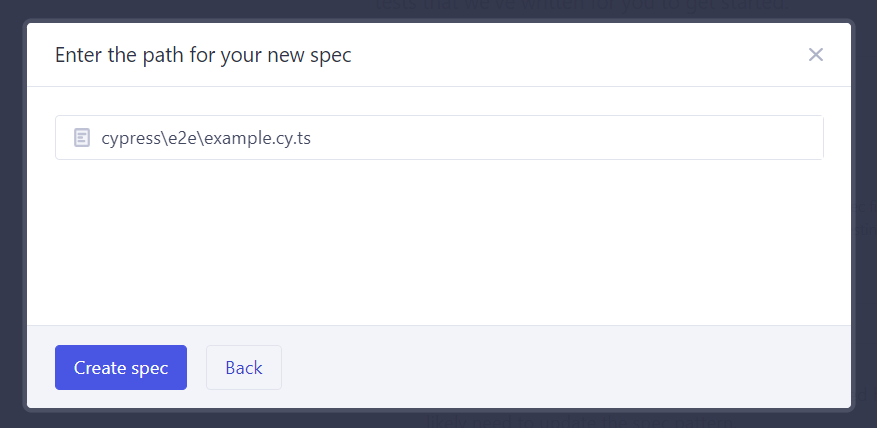
Give your test a name, being careful to specify .ts as the extension so that it will be treated as a TypeScript file by your IDE. Then, click “Create spec.”
Note: If you are not familiar with Cypress, .spec files are the test files that contain the testing logic.
Cypress will initialize the following sample spec for you inside the ./cypress/e2e folder:
describe('template spec', () => {
  it('passes', () => {
    cy.visit('https://example.cypress.io')
  })
})Code language: PHP (php)
It will also launch it by default. So, you will see:
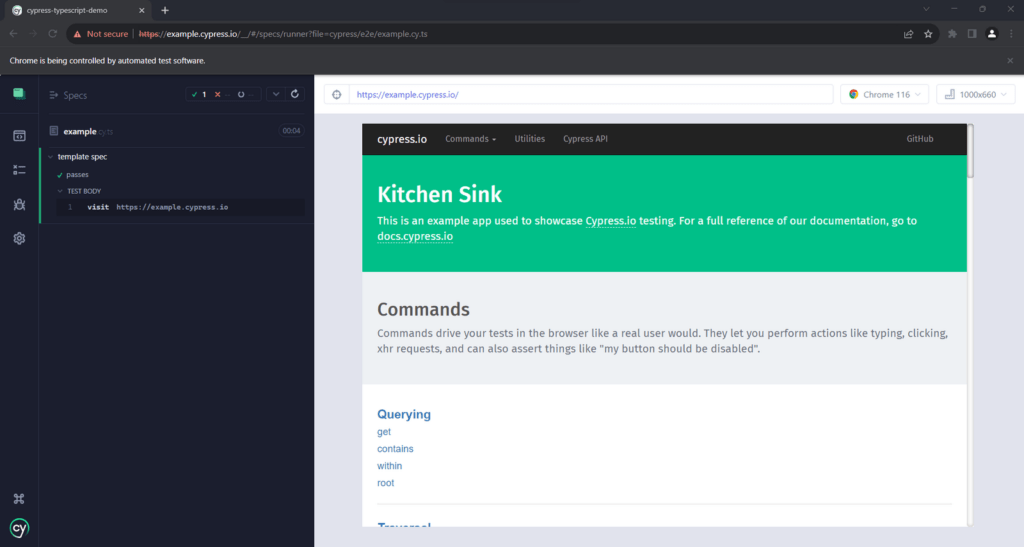
Here, you can verify that the Cypress TypeScript test simply tries to visit an example page.
Step 5: Customize Your Test Logic in TypeScript
Update your script with some testing logic:
describe('template spec', () => {
  it('Contains "Kitchen Sink"', () => {
    cy.visit('https://example.cypress.io')

    // verify that the h1 element contains the expected string
    const title = 'Kitchen Sink'
    const titleElement = cy.get('h1').first()
    titleElement.should('include.text', title)
  })
})Code language: PHP (php)
This simple test verifies that the <h1> element of the test page seen earlier contains the “Kitchen Sink” string.
Cypress will automatically detect the changes and run the new testing logic for you:
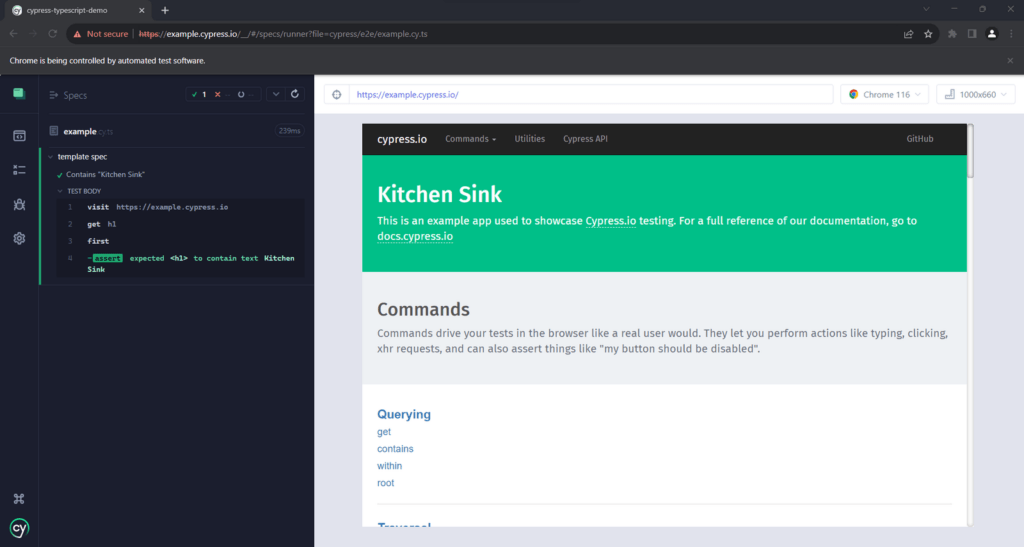
Perfect, the test works as expected.
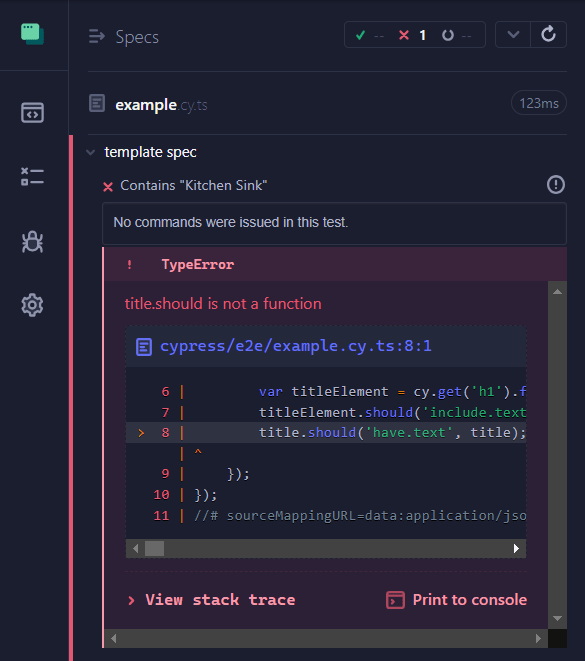
Now, suppose you get confused between title and titleElement. You may end up writing some broken code:
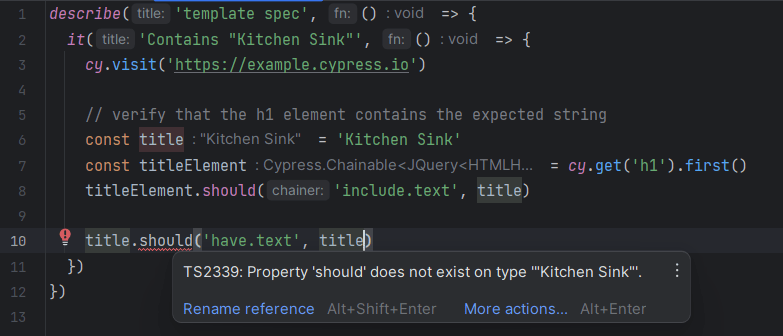
Thanks to the TypeScript integration, the IDE will immediately warn you about the error. This helps make the test more robust and saves time waiting for Cypress to report the error:
Et voilà! You just learned how to use Cypress with TypeScript to take your E2E testing process to the next level!
Bonus: Define Custom Cypress Commands and Assertions in TypeScript
Cypress offers full TypeScript integration, also supporting the definition of custom commands and assertions.
For new commands, all you have to do is specify the custom logic as explained in the docs and then add the required TypeScript type declaration files inside the ./cypress/support folder. Check out the ”Types for Custom Commands” chapter from the official documentation for complete examples.
As for custom assertions, you need to define them through the Chai language and then extend the TypeScript assertion types to make the compiler understand the new methods. Find out more in the doc.
Conclusion
In this article, you looked at what Cypress is and how to integrate it with TypeScript. As seen here, writing E2E tests in TypeScript brings several benefits, and setting up a Cypress TypeScript is not complex.
Through a step-by-step guide, you had the opportunity to learn how to use TypeScript in your Cypress scripts. Robust testing has never been easier!
Thanks for reading! We hope you found this article helpful!