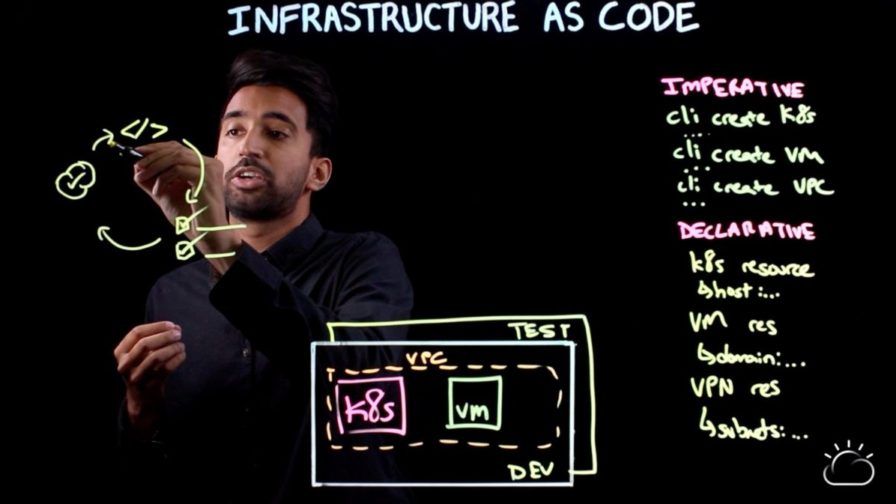
Infrastructure as Code
Infrastructure as Code (IaC) uses a high-level descriptive coding language to automate the provisioning of IT infrastructure. This automation eliminates the need for developers to manually provision and manage servers, operating systems, databases, and other elements that traditionally need to be set up almost from scratch every time they want to develop, test, or deploy an application.IaC is also an essential DevOps practice, indispensable to a competitively paced software delivery lifecycle. It enables DevOps teams to rapidly create and version infrastructure in the same way they version source code and to track these versions to avoid inconsistency among IT environments that can lead to serious issues during deployment.
Declarative Vs. Imperative
There are generally two approaches to IaC:
- declarative (functional)
- imperative (procedural)
The difference between the declarative and the imperative approaches is essentially what versus how.
The declarative approach focuses on what the eventual target configuration should be. It allows to define the desired state, and based on that the system executes what needs to happen to achieve that desired state. The imperative approach focuses on how the infrastructure is to be changed to meet this. Specific commands must be executed in the desired order to get the wanted conclusion.
Immutable infrastructure vs. mutable infrastructure
An important decision to make when automating infrastructure with IaC is whether to establish mutable or immutable infrastructure.
Mutable infrastructure can be modified or updated after it is originally provisioned. This approach gives development teams the flexibility to make ad hoc server customizations to, say, more closely fit development and application requirements, or to promptly respond to an emergent security issue. On the other hand, it also undermines a key IaC benefit, which is the ability to maintain consistency between deployments or within versions. This drawback can make infrastructure version tracking much more difficult.For these reasons, most IaC is implemented as an immutable infrastructure, which cannot be modified once originally provisioned. If immutable infrastructure needs to be changed, it has to be replaced with new infrastructure. Because new infrastructure can be spun up quickly on the cloud—particularly with IaC—immutable infrastructure is much more feasible and practical than it sounds.
The benefits of Infrastructure as Code
IaC allows the orchestration of various kinds of cloud resources, including both on-premises (up to VMs on VMWare vSphere) and open source environments.
Among the key benefits, there are faster time to production/market, improved consistency, faster and more efficient development, protection against churn, all with lower costs, and an improved ROI.
Popular IaC solutions
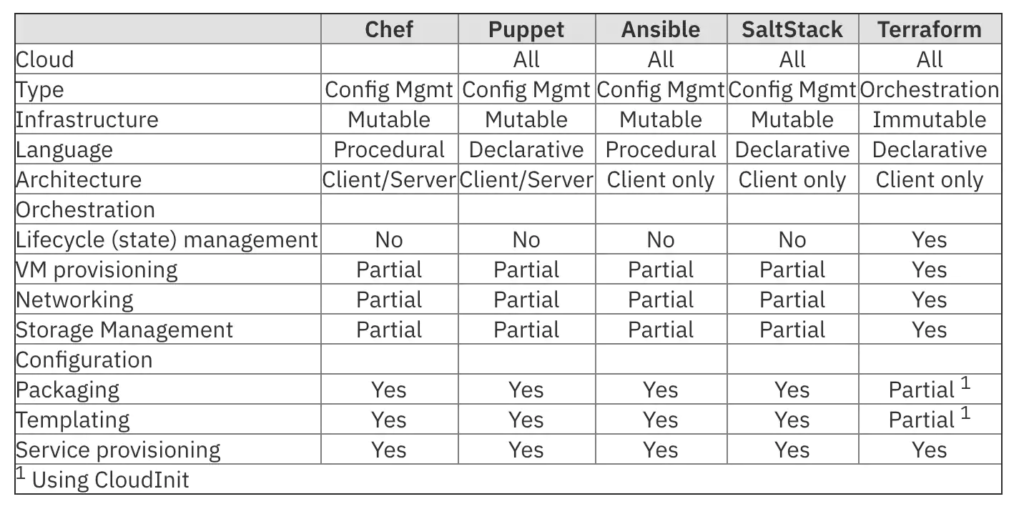
Many solutions are on the market to provision network components through a software description. Among them, it is worth to mention Terraform, IBM Cloud Schematics, AWS CloudFormation, Google Cloud Deployment Manager, Chef Infra, Red Hat Ansible Tower, Cdist, StackStorm, CFEngine, Pulumi, Otter, CFEngine, DSC, and Paco. Each of them takes care of a certain number of steps inside the overall process.
A comparison chart of the aforementioned solutions is available below:
Software-defined networking
In the context of IaC, it is interesting to introduce another interesting possibility, know as software-defined networking. It is an approach that uses software to define network elements, connecting them, and provisioning the needed resources. This approach helps software developers to directly implement an infrastructure with lines of code, when not using pre-defined templates. Some SDN frameworks allow for orchestrating both open-source and on-prem resources.
You can know more about SDN watching this video.
Software-defined data center
Now that we know what software-defined networking means, we want to learn how to implement a full data center through its software description.
What is a Software-defined Data Center?
A Software-Defined Data Center (SDDC) results from years of evolution in server virtualization. It extends virtualization from computing to storage and networking resources, providing a single software toolset to manage those virtualized resources. Plus, the SDDC enables policy-driven automation of provisioning and management, which speeds the delivery of resources and enhances efficiency.
SDDC Components
The SDDC combines three kinds of virtualizations, about compute, storage, and networking resources. Let’s give a shot look at each of them.
Compute virtualization, or server virtualization, improve resource usage. Virtualization abstracts operating systems and applications from physical servers through a hypervisor. Virtual machines can be used to run multiple, distinct applications and operating systems on a single server.
Storage virtualization pools resources too, and optimizes their usage. Virtualized storage improves flexibility and scalability because you can provision storage from the pool, without having the need to purchase new capacity. With virtualized storage, you can also allocate storage dynamically, on-demand.
Network virtualization enables you to provision and manages networks independently of the physical hardware. That abstraction of resources decreases provisioning time and enhances flexibility, allowing you to more easily move workloads across data centers without physical constraints. The right network virtualization solution will also incorporate security capabilities to safeguard networks and isolate workloads.
The SDDC integrates these virtualization layers, creating a single, hyperconverged environment that facilitates the delivery of IT resources as a service, regardless of being deployed in a private, public, or hybrid cloud environment. A single management platform standardizes management across the virtualization layers and enables policy-based automation that simplifies operations.
IBM Cloud Schematics
With IBM Cloud Schematics, you can organize your IBM Cloud resources across environments by using workspaces. Every workspace can be connected to a GitHub repository that contains a set of Terraform configuration files, which build a Terraform template. You can choose to create your own Terraform template or use one of the pre-defined templates that are provided by IBM (see this link). Workspaces allow for the separation of concerns for cloud resources and can be individually managed with IBM Cloud Identity and Access Management.
Infrastructure as Code and IBM
Schematics is IBM Cloud’s solution for automating infrastructure management with consistent provisioning and orchestration. Built on Terraform, IBM Cloud Schematics features an easy-to-use graphical interface to manage the entire infrastructure stack across multiple platforms. Pre-built templates allow developers to easily replicate or update environments and implement version control across the entire organization. It is worth noting that Terraform can be defined as a safe workflow across providers and the community around it prevents vendor locking.
Creating your IBM Cloud account
To work on IBM Cloud Schematics, sign up for an IBM ID and create your IBM Cloud account. It’s free for many features, allowing you to do real things and understand how to make real business choices on it.You can access all free examples listed in the IBM Cloud’s Github page. These sample templates have been made freely available on Github.
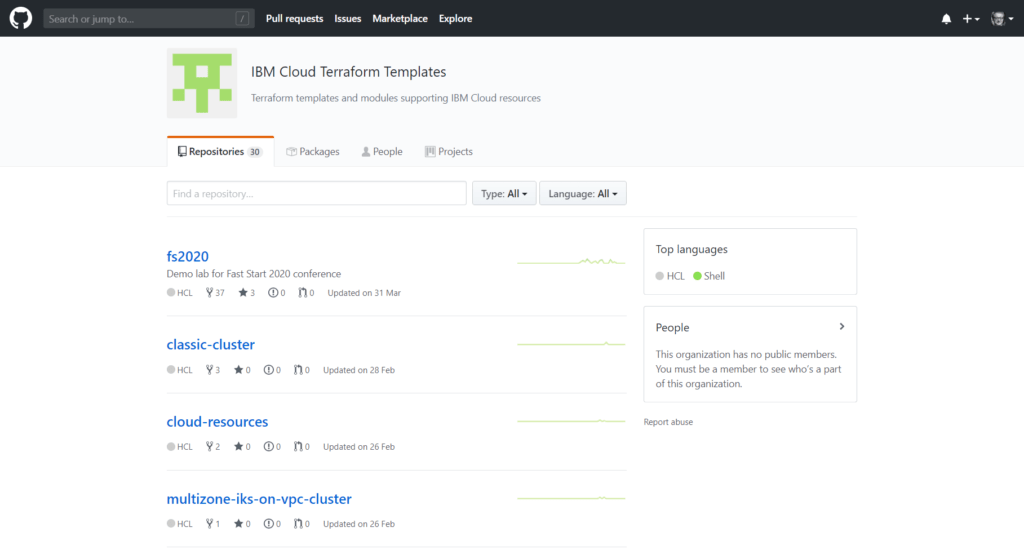
Let us see how easy it is to use IBM Schematics on the IBM Cloud to implement virtual networks and provision them.
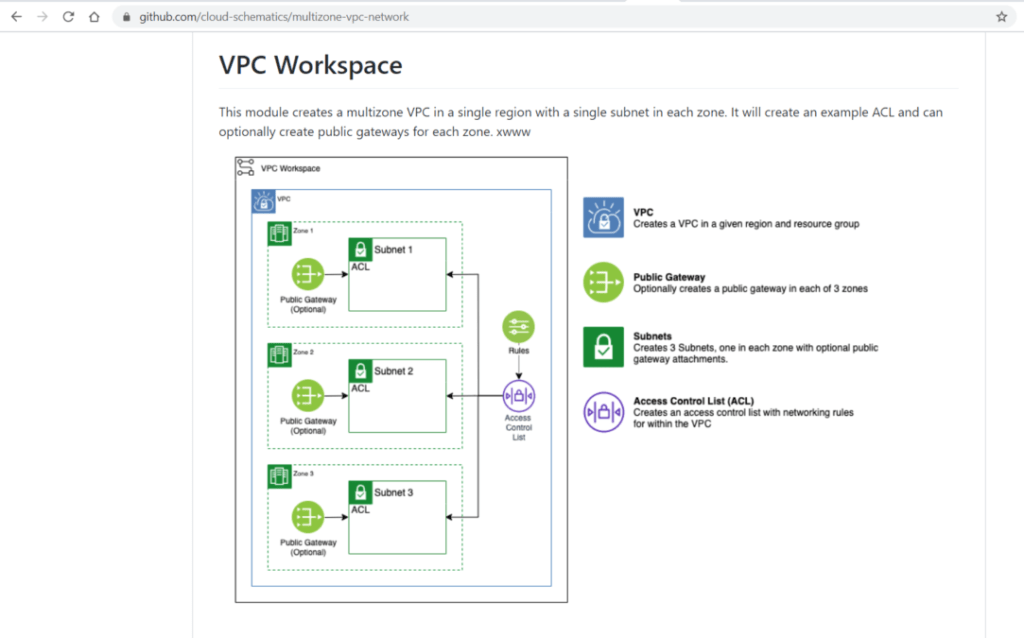
Example: A Multi-zone three-VPC’s network
We’re gonna implement a three-element VPC network. You can see the proposed architecture on the diagram shown below.
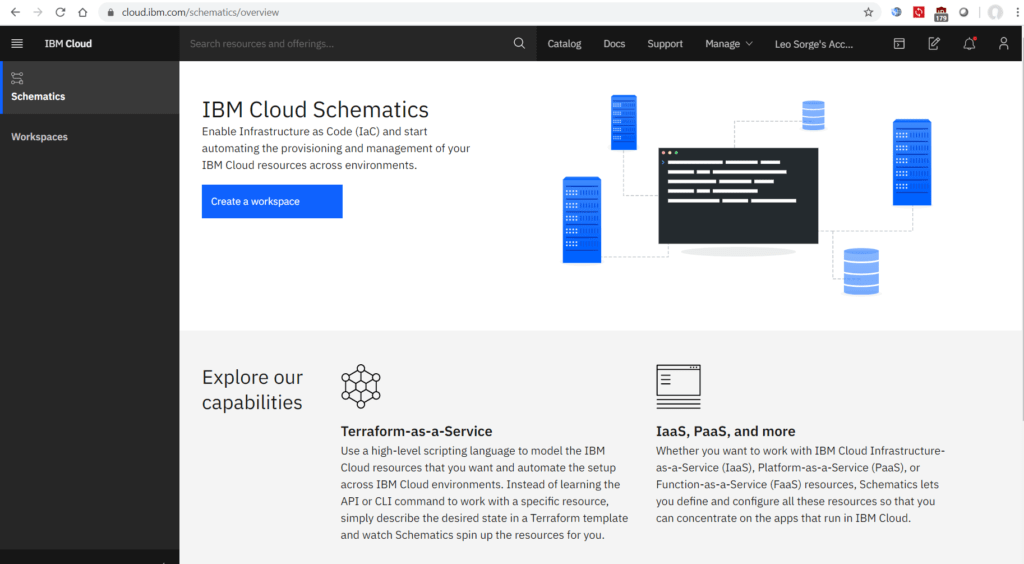
Accessing IBM Schematics
Schematics is one of the functions of the IBM Cloud framework. You can access it clicking on the four-bar icon (left-top of the home page) and then on Schematics.
You’ll need three things to work on this project: your Github page, an IBM Cloud access, and the Github page address for one or more IBM IaC examples.
Getting a Personal Access Token
You are a developer, so let’s assume you already have your Github page. You’ll need a Personal Access Token (PAT) to access private repositories. You most probably know how to get it, but just in case you’re brand new to it, let’s recap how to get it.
- Open your Github page
- Click on your name’s icon (right-top)
- Click on Settings
- On the new screen, locate the options list at the screen left and choose Developer settings
- A new left options bar shows up: select Personal Access Token
- On the new screen, some underlined words appear. Just click on Generate;
- In the Note textbook, give a name to this PAT (it is “schematics_ex1” in our example);
- Ask more specs checking on the suggested options (not mandatory)
Go to the end of the page and click on Generate token.
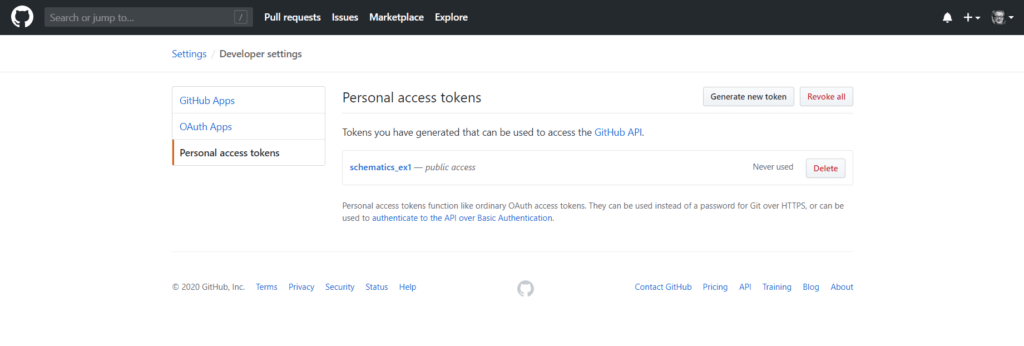
The generated token appears on the screen. A copy icon is located just at the end of it: click on it and your code will be transferred to your clipboard. Make sure to paste it somewhere, e.g. a text file.
Generating an API Key
Open the IBM Cloud home page. On the upper bar, locate Manage and click on it, then choose Access (IAM).
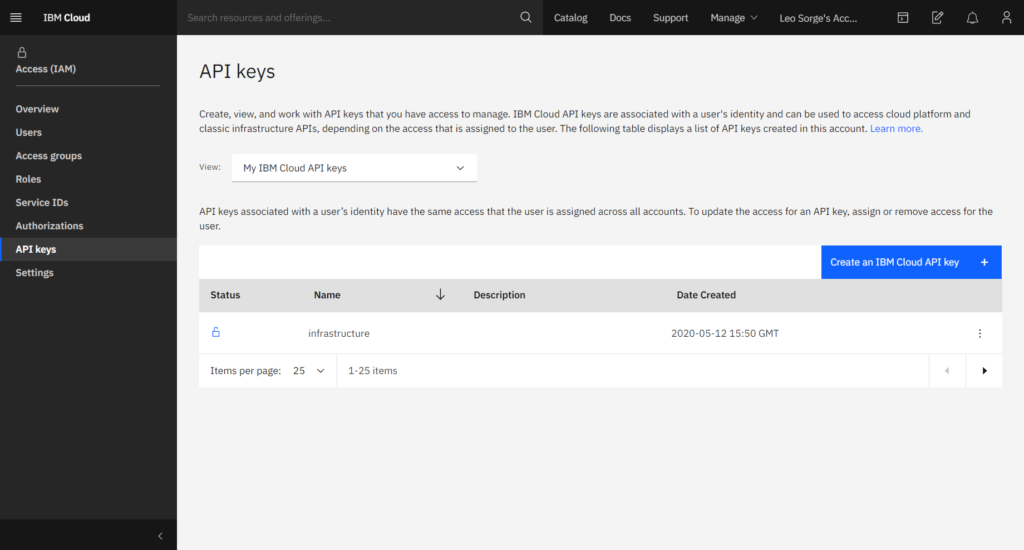
Locate the left menu and choose API Keys. Locate the blue box prompting Create an IBM Cloud API key. Click on it, then name your API key: the given name is “infrastructure” in our example. You have successfully created the requested key: you can see it, save it or download it as a JSON file.
IBM Cloud Schematics’ GitHub page
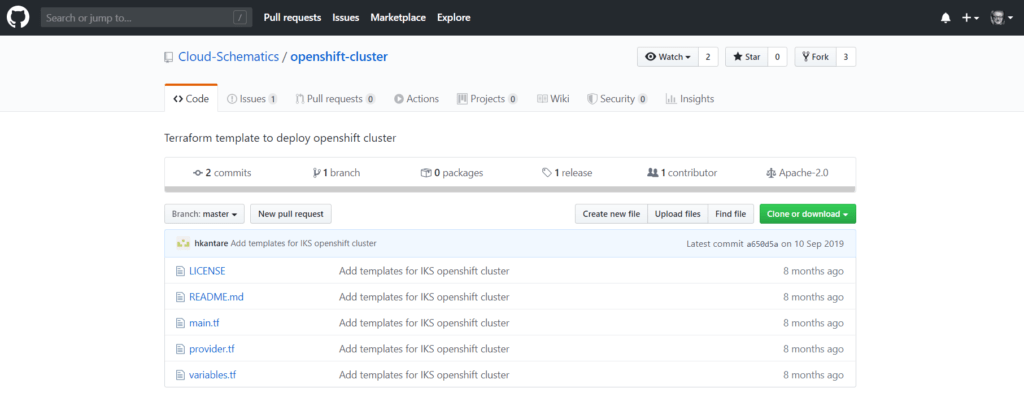
This example is written with Terraform version 0.11 available. New Terraform versions can be published any time, so it’s normal that the Github repositories are updated with new versions of the code- and the old ones are made unavailable.Please check what is the Terraform version (ex.: 11, 12) in the Readme file. The example code page for Terraform version 0.12 is online at this link.
Schematics: Create a workspace
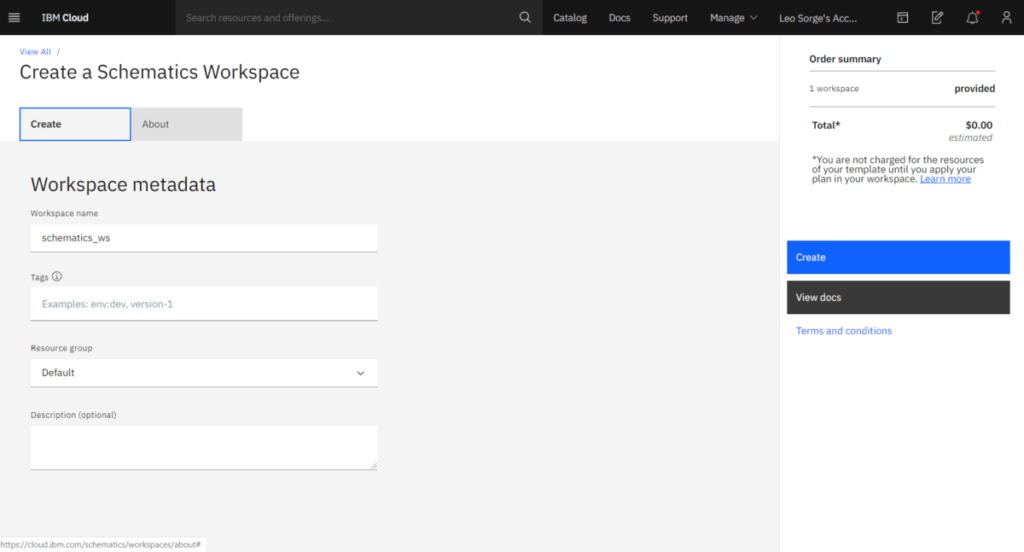
From the Schematics screen, click on Create Workspace.
Settings with your number
You choose a name and click on create. You are assisted with color prompts during this process.
You now insert the Github page for the describing files and your Github Personal Access Token (if needed; in case you are using IBM’s provided Terraform templates, you don’t need it). On the pull-down menu, choose the correct version for Terraform.
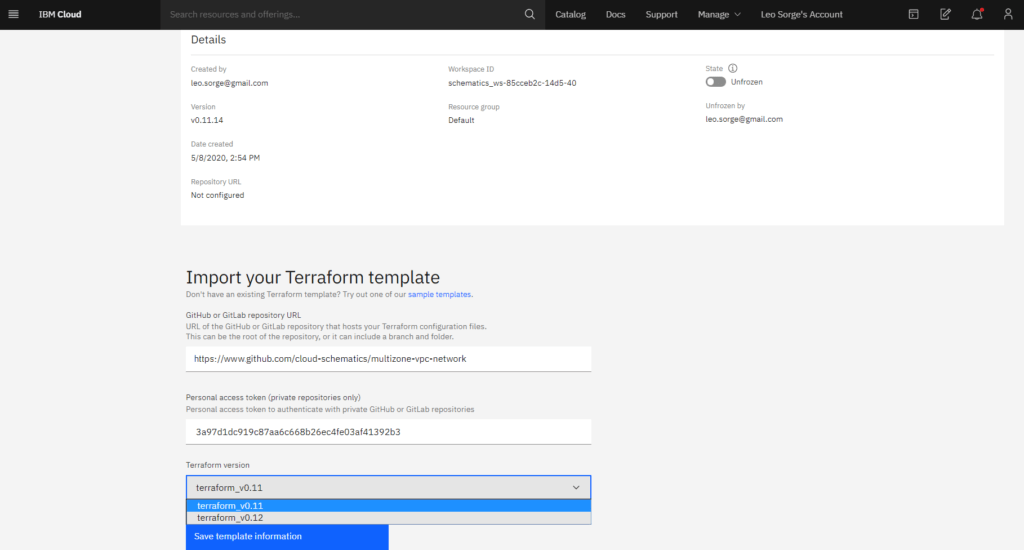
You’ll see in this example that the generating directory is located at https://github.com/Cloud-Schematics/multizone-vpc-network/tree/master/tf_v_0_11_x/multizone_vpc.
We also saw how to generate an API key.
You also know we need to check the Terraform version on the ReadMe file in the Github directory.
Import repository
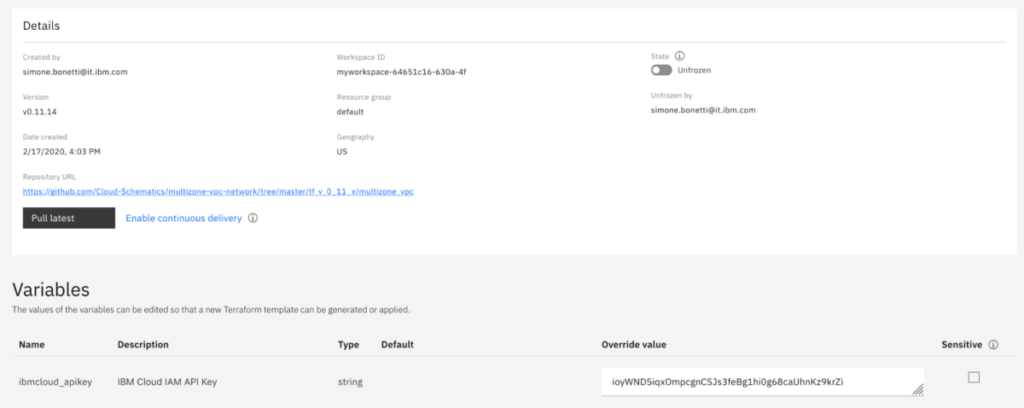
Import the code from Github, then insert your user’s API key as previously generated.
Generate a plan
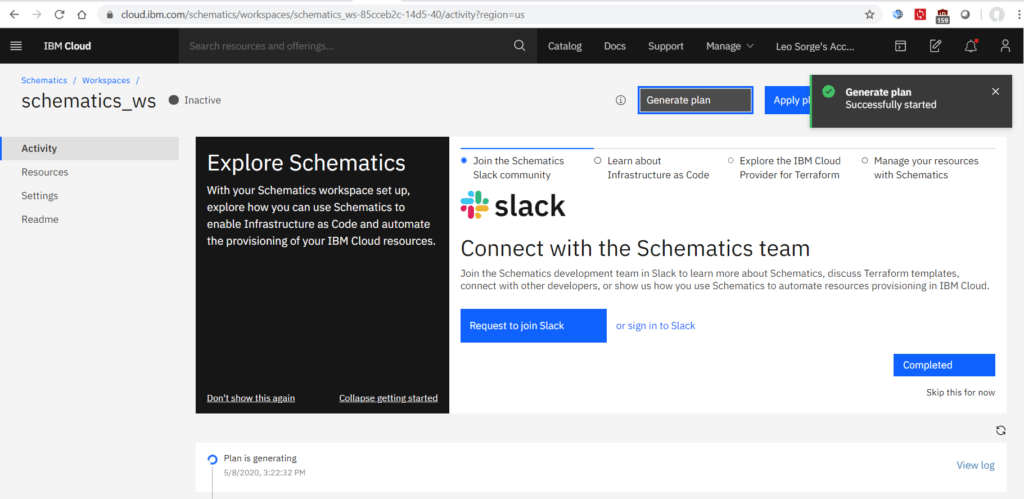
Just click on the Generate Plan box and wait. The final state will appear like this:

Apply plan

The freshly generated plan is waiting for you to apply it to real communication and execution hardware. Let’s click on Apply Plan.
Confirmation
This is the confirmation message:

Search for Tags
You can also access logs on the applied plan, which are basically all stored in a text file. To see them, scroll that file and locate the lines named “tag”.

Verify proper VPC network creation
Go check the resource list: is this the promised configuration?

Click on the blue tag
Locate the Edit Tags screen, then click on the blue tag name.

Explore VPC Subnets
You can now explore the created subnets and try to imagine what can you do with such a powerful infrastructure as code workbench.

It’s done! You have just generated your plan.
Terraform code
Before concluding this quick overview, let’s have a look at some code. Here is the first part of the vpc.tf file.
##########################################################################
# This file creates the VPC, Zones, subnets and public gateway for the VPC
# a separate file sets up the load balancers, listeners, pools and members
##########################################################################


##########################################################################
# Create a VPC
##########################################################################

resource ibm_is_vpc vpc {
  name           = "${var.unique_id}-vpc"
  resource_group = "${data.ibm_resource_group.resource_group.id}"
  classic_access = "${var.classic_access}"
  tags           = "${var.tags}"
}

##########################################################################


##########################################################################
# Prefixes and subnets for zone 1
##########################################################################

resource ibm_is_vpc_address_prefix subnet_prefix {
  count = 3

  name  = "${var.unique_id}-prefix-zone-${count.index + 1}"
  zone  = "${var.ibm_region}-${(count.index % 3) + 1}"
  vpc   = "${ibm_is_vpc.vpc.id}"
  cidr  = "${element(var.cidr_blocks, count.index)}"
}

##########################################################################Code language: PHP (php)
More case studies
Two provisioned virtual instances
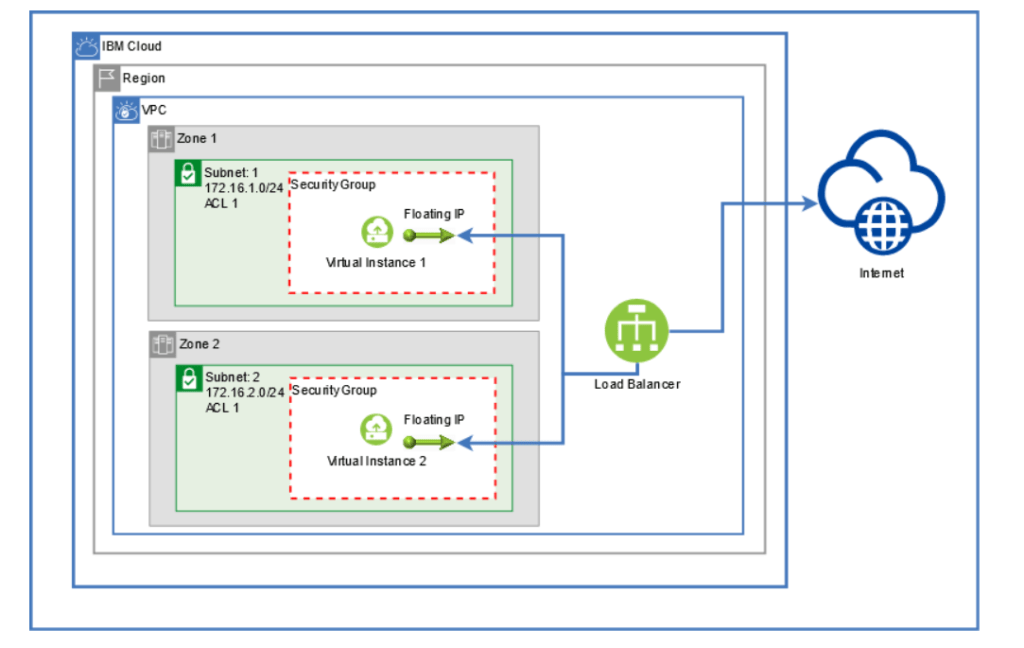
In this additional example a VPC is created, then it sets up two zones each with a subnet, and places a virtual instance, in each deploying a load balancer attached to the servers. A simple cloud-init script will install nginx, just to showcase an http response for proving out the example.
This example requires a slightly more complex procedure than the previous one. If you want to learn more about it, the code is available at this link.
A Kubernetes cluster
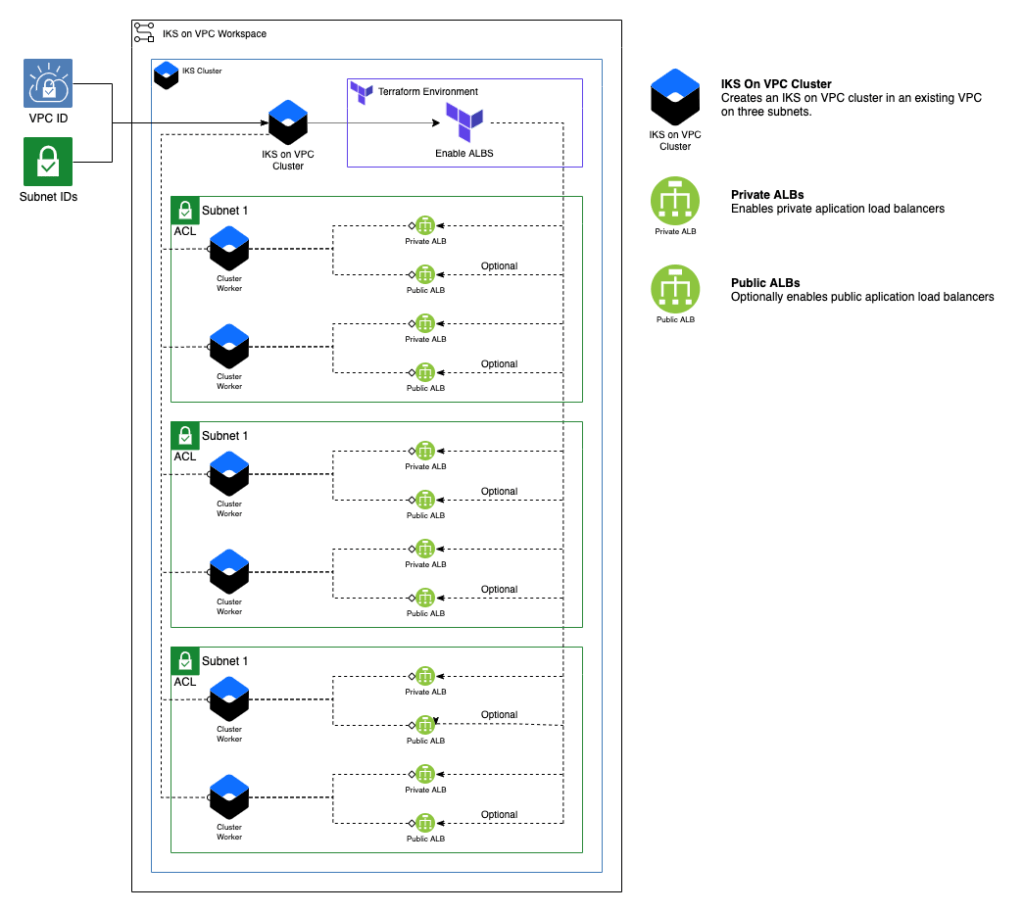
This module creates Kubernetes cluster on an existing VPC network and enables Private ALBs (Application Load Balancers). Optionally, it can also enable public ALBs. Modules are included for Terraform version 0.12.0.
If you want to discover more about IBM Cloud, click here!


