
In a previous article, we discussed how to create a new web app and deploy it to an Azure Web App instance. This article goes a step further, creating a Docker image for the web app in order to have more flexibility in management and deployment.
Introducing Docker
Fast-growing business organizations have to deploy new features of their app rapidly if they want to stay on top of the market.

Deploying an app is not always an easy task; how difficult it is depends primarily on how the app is structured and what tools or deployment patterns have been used.
In recent years, the rise of container technologies has changed the game: complex issues related to provisioning infrastructures and software installation dependencies have faded into the background.
There are lots of benefits to using container technologies:
- Reduced deployment time;
- Simple host configuration;
- Multiple apps can run at the same time using different containers;
- Quick scaling;
- Savings in infrastructure costs;
- Containers are based on images, which are simple to create and manage;
- Containers share the same hardware resources but maintain isolation between them.
Many people prefer using Docker for development (with an isolated environment) or for complex distributed architecture such as Microservices. Containers differ from Virtual Machines, in that thy offer quick startup and share the resources of the host (avoiding unauthorized access between one container and another). On the other hand, containers don’t offer the same hardware isolation as Virtual Machines. Indeed, security can be a reason for blocking the adoption of this method, since containers share the host operating system.
Docker, a company founded by Solomon Hykes, has prevailed among the various container technologies thanks to its complete, ready-to-use ecosystem. With this in place, it is possible to create and distribute an app and execute it either on-premises or in cloud environments. Specifically, the app is compiled into an image using the Docker CLI: starting from a base image with a specific operating system (i.e., Linux or Windows), Docker creates an image which comprises both the app and the execution environment. The compiled image is then stored in a local or remote repository from which it can be downloaded and started. Docker also offers a cloud subscription to DockerHub, which supplies build and collaboration tools to facilitate cloud and container technology adoption.
Docker installation
To use Docker, you need to install the Docker Engine on a developer machine: this page offers a list of supported platforms and the steps required to set up your environment. Note that installation requires a Docker Login account.
After installation, all available toolswill be installed on your machine (stored here), such as the Docker CLI, which helps to spin up the first container using the following command:
docker run hello-world
The following is then displayed:
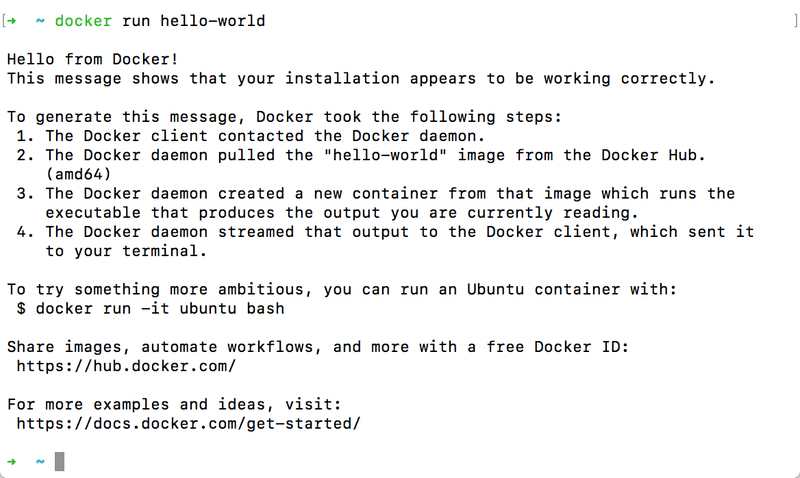
Docker runs as root user by default. Unless a name is specified, Docker will automatically assign a random name. Other useful commands include:
docker run -d image: run the container in background (detach mode);docker ps -a: get a list of containers;docker pull: access a specific image from a Docker Registry (private or public) and store it on the machine (more here);docker image list: access available images on the local machine;docker start <CONTAINER_NAME>: starts a specific container;docker stop <CONTAINER_NAME>: stops a specific container;docker rm <CONTAINER_NAME>: deletes a container that is not in execution;docker image rm <IMAGE_NAME>: deletes a container image;docker container inspect <CONTAINER>: shows details about containers;docker image inspect <IMAGE>: shows details about images (including layers);docker volume: to create new data volume (more here);docker history <IMAGE>: to see image layers;docker compose: to create multiple containers at the same time (more here).
The build command helps to create an image for your app:
docker build <PARAMETERS>
Create a Docker image
This section explores the creation of a Docker image, starting with an example found in a previous article.
A Docker image is simply a file composed of different layers created during the build phase. It can contain code, configuration files, libraries, and environment variables. Docker images don’t contain an operating system, but rely on the OS of the host. For this reason, images are categorized by the kernel they use: Linux or Windows. If you are using Linux, you can only run Linux containers. If you are using Windows, you can run both container types. The Docker run command explained in the previous paragraph creates a new Docker Container. Docker images are also created by a Dockerfile. A Docker image is an immutable artifact: it contains many read-only layers dependent on the base images or the Dockerfile definition. Layers function as the building blocks – once a container is started, it has a read/write layer.
Create a Dockerfile
First, you need a Dockerfile – a text file containing a list of steps that execute sequentially during the build process.
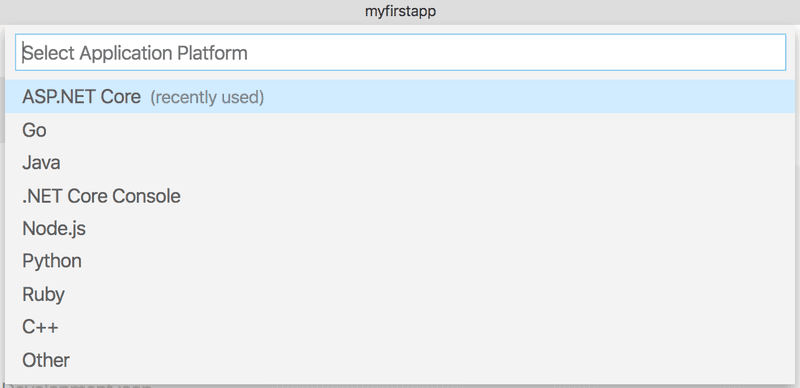
Creating a Dockerfile in Visual Studio Code is relatively simple; once the Docker Extension is installed, the command palette helps (via a wizard) to generate a Dockerfile related to your project. These are the settings:
- Application Platform: ASP.NET Core
- Operating system: Linux
- Port: 80, 443


At the end of the wizard, Visual Studio Code will show a text file like this:
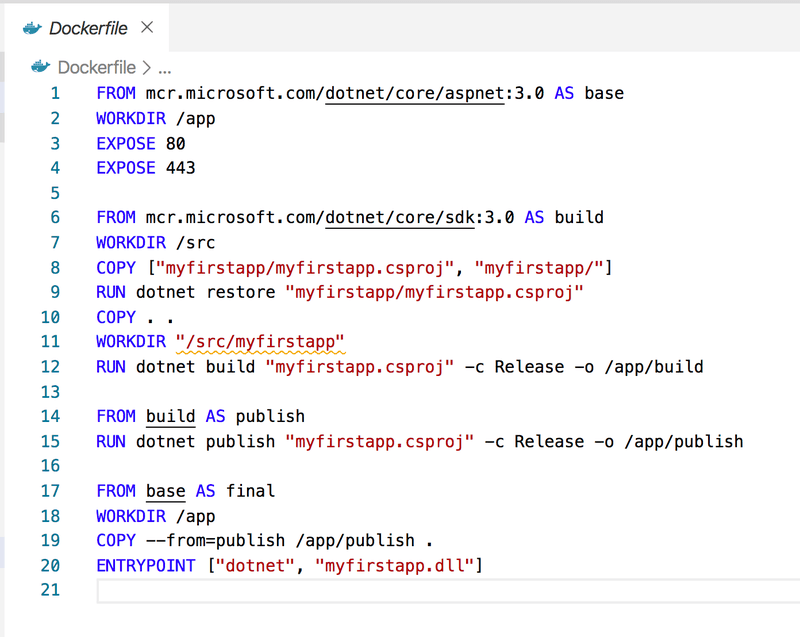
This file is composed of different sections starting with the FROM keyword. These define the base image from which to build your image (which includes your app). A Dockerfile can contain multiple FROM statements (multi-stage builds). Other available keywords are:
WORKDIR: sets the current directory during the build process;EXPOSE: sets the ports to listen to incoming connections at runtime;COPY: copies files;RUN: runs commands during the build;CMD: defines arguments for the entrypoint;ENTRYPOINT: is the command to run when the container starts.
The reason for the multiple sections in this Dockerfile is that Docker images can be built using different configurations. For example, in this Dockerfile, you can choose to use the ‘build‘ section instead of the ‘publish‘ section to compile the application only.
Create a Docker image
To create the image, you can execute the following command in the same directory of the Dockerfile:
docker build -t myfirstapp:v1 .
The ‘t’ parameter stands for tag. This is a fundamental concept of Docker – it helps to organize images, and is composed of the name and the version of your app. Usually, the last built image is identified as the latest. The dot (.) parameter represents the local directory. If you execute the command docker image list you should see the new image on the local repository list. The app can be started on the local pc using the command:
docker run -p 8080:80 -d --name CONTAINER-NAME IMAGE_NAME
However, since we want to start the container on Microsoft Azure, we need to store the image on a container registry such as DockerHub (the default option). As mentioned previously, to install Docker, a Docker Login is required. This allows users access to free repositories on DockerHub.
To create an image for DockerHub, you need to tag it using your DockerHub username:
docker build -t <dockerhubusername>/myfirstapp:v1 .
Finally, push the image using:
docker push <dockerhubusername>/myfirstapp:v1
Start the image on an Azure Web App
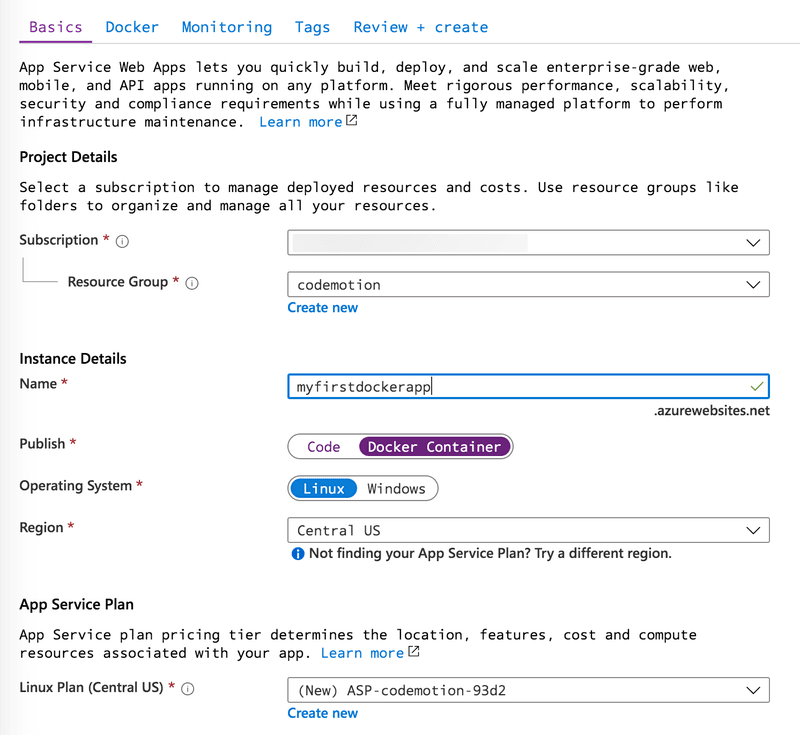
To host the container, go to the Microsoft Azure Portal and create an Azure Web App (instructions can be found in the article mentioned in the first paragraph) and select Docker Container for the Publish parameter:
Clicking ‘Next Docker‘ will show the Docker image configuration:
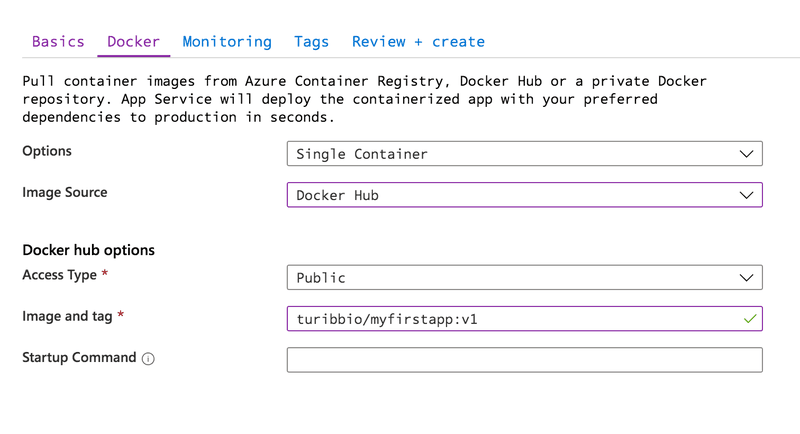
Change the configuration to these settings:
- Options: Single Container;
- Image Source: Docker Hub;
- Access Type: Public;
- Image and Tag: the image name and tag previously created.
Click to ‘Review + Create’ and then click on ‘Create’. Microsoft Azure will start the resource provisioning. Once this is complete, you will be able to navigate to the Azure Web App address to check that the application will run correctly.
Start the image on an Azure Container Instance
Another way to deploy a container in Microsoft Azure is to use an Azure Container instance (ACI). This service allows you to spin up a container in a few steps, guaranteeing perfect isolation for your application and expediting the app‘s scaling. The pricing is also appealing – you pay only for the time the container is up.
To create an Azure Container instance in the Azure portal, create a new resource using the side menu. In the search box, type ‘Container Instances’, and then ‘Create’.
Fill in the ACI settings as in the following image, inserting the name of the image you have created in place of the image name:
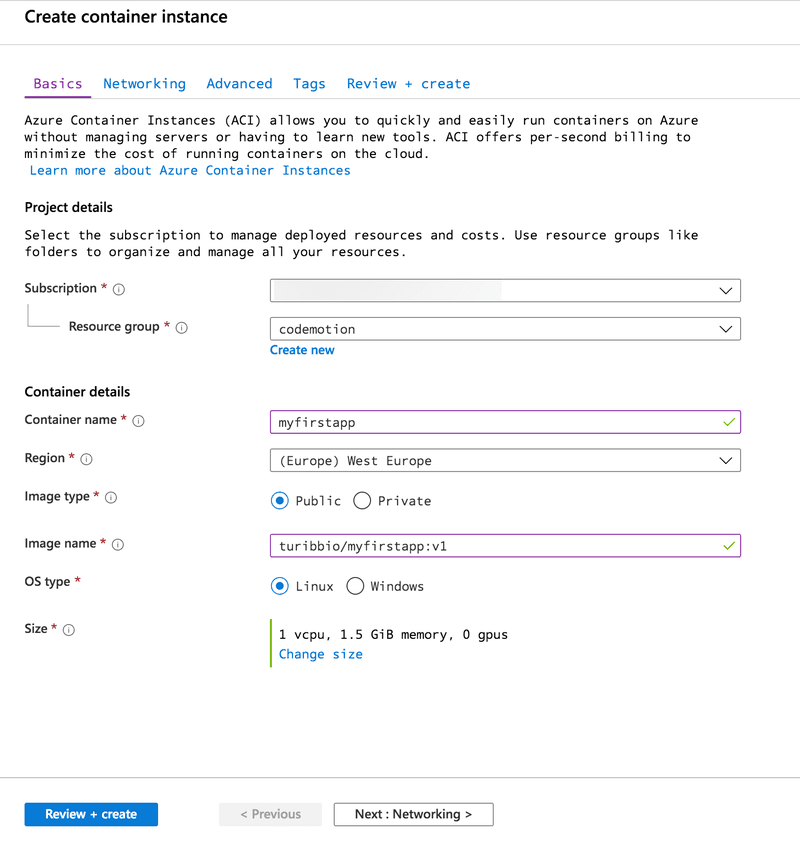
Once this is done, click to ‘Review + Create’ and then on ‘Create’. When the provisioning completes, check the settings page of your ACI for the assigned IP address to visit the running app.
Advanced scenarios
Until now, we have considered only a simple scenario with just one image. Using multiple images that work together requires an orchestrator like Kubernetes to help you provision, manage, and scale. A forthcoming article will cover this topic, focusing on the Azure Kubernetes Service.