Interactive voice response (IVR) systems allow for the automation of telephone conversations, which provide a better user experience for customers, and save time for your employees. Let’s build one using Python!
Used alongside technologies such as virtual PBX, IVRs can help to revolutionize your business communications. (Don’t worry if you’re wondering what is virtual PBX? We’ve got you covered).
We’re going to take a look at a couple of ways in which you can easily build your own working IVR system using Python.
What is an IVR System?
An IVR system provides an alternative method for businesses to communicate with customers over the phone. It is operated by voice, alongside the DTMF tones which are produced when keys are pressed on the keypad of a phone.
IVR systems can be utilized with both landline and VoIP phone services, but the ability to pair them with added features on Internet Protocol based services gives them the edge in the eternal VoIP vs. landlines debate.
What are the Benefits to Using an IVR System?
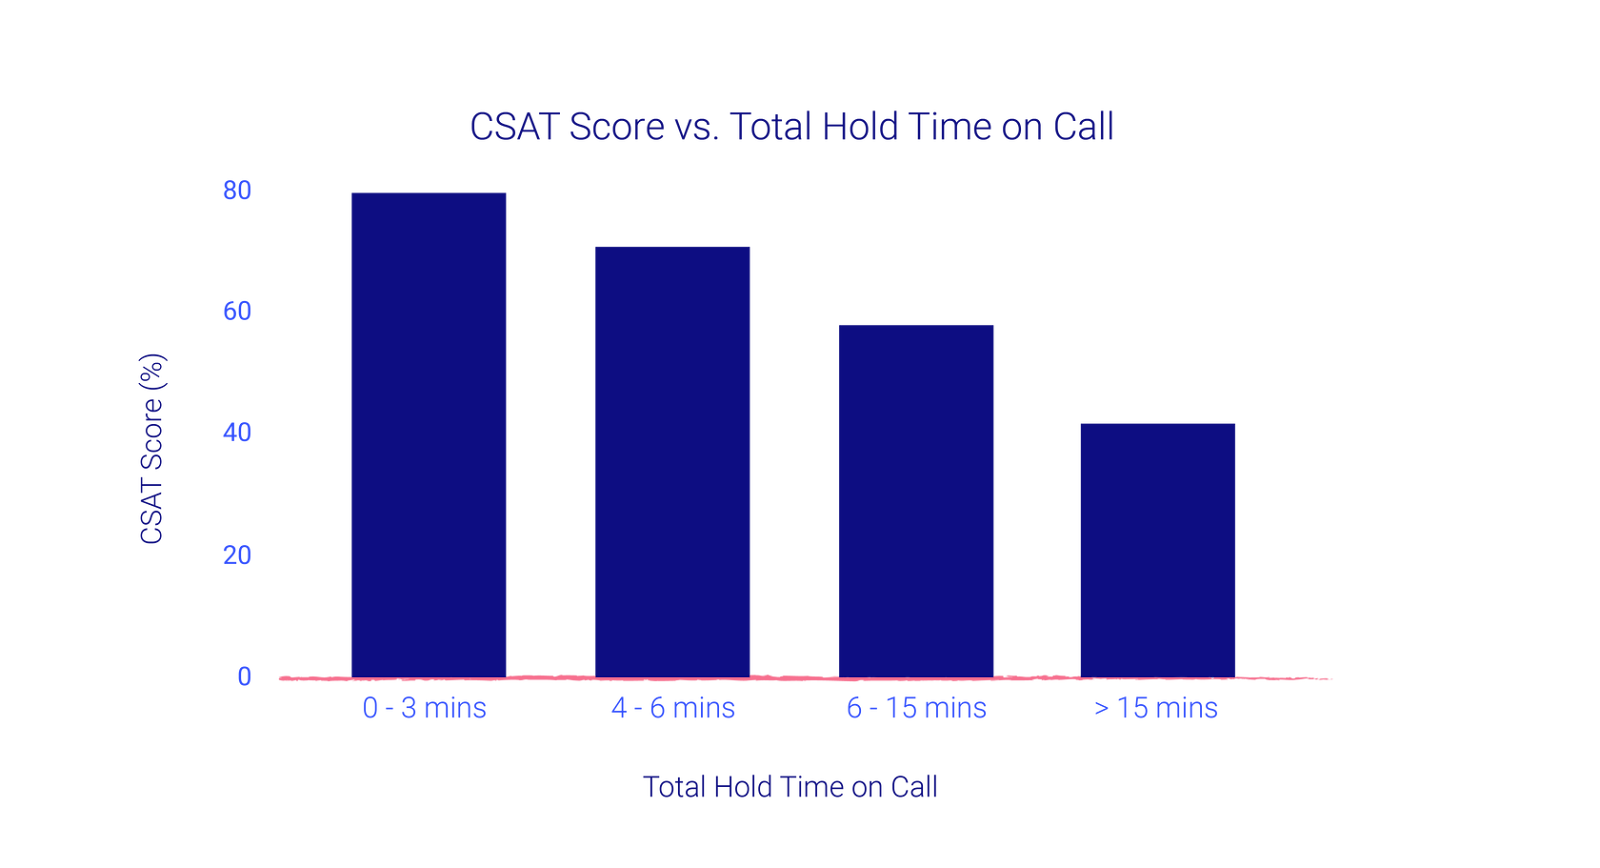
IVR systems can streamline the user experience when contacting a customer service department. They provide self-serve options to speed up the user experience, while freeing up contact center agents to deal with more complex issues. The shorter the amount of time a customer has to wait on hold, the higher your CSAT scores will be, on average.
Image source: Dialpad
They are often used alongside other technologies such as live chat in order to modernize contact centers, although there’s no need to worry about mastering live chat best practices with IVR, as it’s unmanned and fully automated.
They also facilitate smarter call routing options, and can even offer secondary language support, perfect if your business experiences a lot of international calls.
IVR can help customers to interact with your brand where they may not otherwise be able to. For example, users with visual impairments, or those who have no internet access or access to a computer or mobile device, may find it easier to communicate with your business through an IVR system.
Two Ways to Build an IVR System With Python
Python, as a high-level programming language with dynamic semantics, is the perfect tool to build an IVR system. The increased productivity it provides, as well as the rapid speed of the edit-test-debug cycle, means that it’s easy to get an IVR system up and running in no time.
We’re going to take a look at a few of the most convenient ways that you can build an IVR system using Python, so you can spend more time on other problems, like how to use topic clusters for your content marketing.
1. Build an IVR System with Python and Django
Django is a web framework for Python, and it can be easily used to build an IVR system. Before you get started, however, there are a few tools you’ll need access to.
What You’ll Need
- Python
- Django
- ngrok – this is a utility program that provides a secure way for your local development environment to connect to the internet during development.
- A phone line to test your IVR system once it’s complete.
Create a Virtual Environment
The first step is to create your Python virtual environment in which you can develop your IVR system. This will allow you to install packages without affecting any other projects on your system, so don’t worry about altering your data science in manufacturing programs.
Create a new directory in Python for your project. You can name it “ivr-test”, or something similar. Then, create the virtual environment.
You’ll see that a new directory called “venv” has been created. This is your virtual environment. In order to start using it, you’ll need to activate it.
Once this new virtual environment has been activated, any packages you install will only be applied to this environment.
Create a Django Project
Now you can install Django into your virtual environment. Using your terminal, install “Django”. Then use the command line utility “django-admin” to create a new project. Name it “ivr”, or something that you’ll be able to easily identify.
This will create a new directory with the title of your choice, which contains your project settings. Installed apps, database configurations, and more can all be accessed from here.
Django features several built-in features that require database tables to run, and uses a file based database called SQLite as default. In order to complete the setup, you’ll need to run the initial database migrations.
Once you’ve done that, your Django project should be up and running.
Establish a Tunnel With ngrok
Your new Django server will be running on your computer at port 8000. This server will need to be connected to the internet in order to receive calls. For this we’re going to use ngrok.
Download ngrok and unzip it to your active directory. With Django still running, open a new terminal window and execute the ngrok command. Ngrok will now be accepting HTTP requests and forwarding them to your server at port 8000.
Accept Calls
You’ll need a phone number with voice capabilities that can be used for incoming calls, so make sure you have this ready.
In order to start accepting calls you’ll need to set up a webhook. This is a URL in your server that will be triggered in response to an incoming call, which will accept the call and greet the user.
Create an App in Django
Now you can use Django to build the app that will determine what functions are used in response to various inputs from the caller.
Create a new Django app, and name it based on the job it’s designed to perform.
Build Your IVR System
Now that your local environment can accept phone calls, you can set up your IVR system to perform whatever functions you need it to.
In order to do this, you’ll need to set up some database models from which your IVR system can pull information. This will help your IVR system direct calls or answer queries, whether your business is selling a waiver template or promoting water parks.
Once you’ve set up the relevant database models, you can create tables using the Migrations in Django ORM. You can then input the data that your IVR system will need to access into these tables.
Write Some Code
Now it’s time to start writing code so that your IVR system can participate in conversations with callers. Replace the “answer()” function with the first part of the conversation.
You’ll need code which allows your IVR system to react to inputs from the user. These could include:
- “finish_on_key” – this will allow the IVR system to know once a user has finished inputting digits on the keypad when it detects a predetermined key, such as “#”, is pressed.
- “action” – this will tell the IVR which URL to gather information from next.
- “timeout” – this will dictate how long the IVR system should wait for the user to input information

2. Build an IVR System with Python and the Telnyx API
In order to build an IVR system using the Telnyx API and Python SDK, you’ll need to use Flask, which is a micro web server framework. This can be installed using pip.
A set of basic functions are required in order to perform Telnyx Call Control Commands. These can include “answer”, “speak”, and “gather”, among others.
In order to execute this API you’ll need Python telnyx installed.
Flask is used to set up a local server, and once again, ngrok will be used in order to receive webhooks from Telnyx.
Receiving and Interpreting Webhooks
The “respond()” function will need to be configured in order to handle incoming webhooks and act accordingly based on user inputs.
The first step is to see what kind of webhook is incoming, and whether or not it is an event. This is done using “record_type”. What type of event it is can then be checked.
Build the IVR Demo
Once the basic Telnyx Call Control Commands are established, they can be placed in the correct order to build the IVR demo.
They will be structured in a way that allows these steps to be followed:
- An incoming call can be parked.
- Dial functions can be executed to the user’s PSTN number.
- IVR allows the call to be accepted or rejected.
- Upon answering, the user is presented with an IVR greeting.
- Pressing 1 will accept the call, and it is parked.
- Pressing 2 will reject the call, and it is sent to voicemail.
- SMS notifications can be sent to the user alerting them to a voicemail message.
Create an Object to Store Call Information
A simple class can be created in order to hold call information. This will be above the “respond” function required by Flask, and hold the “call_control_id” and “client_state” variables.
This variable should be declared as “global”, so that it can be referenced in the “respond” function.
Answer an Incoming Call
A simple Call Command can be added in order to answer incoming calls.
Underneath the “call_initiated” check, add the following:
my_ivr.call_control_id = data.get('payload').get('call_control_id')<br>print(telnyx.Call.answer(my_ivr), flush=True)Code language: PHP (php)This code answers the incoming call, but will require some added call logic before it can do anything else.
Presenting IVR Options
Once the call has been answered, the “Gather Using Speak” command can be used to present the caller with further options. In order to do this, the following check needs to be added:
elif event == "call.answered":
     print("Call answered", flush=True)
     print(telnyx.Call.gather_using_speak(
     my_ivr,
     payload="Call Forwarded press 1 to accept or 2 to reject",
     language = "en-US",
     valid_digits="123",
     voice = "female"),
     flush=True)
Code language: PHP (php)
This code will alert the user by saying ‘Call forwarded press 1 to accept or 2 to reject’.
Once the user inputs their selection, the dtmf webhook will be sent to the IVR application.
Which digit has been pressed will be checked with the following code:
elif event == "dtmf":
    digit = data.get('payload').get('digit')
    print(digit)
Code language: PHP (php)
In order to act accordingly based on what response was detected, other call commands can be executed using the following code:
elif event == "dtmf":
    digit = data.get('payload').get('digit')
    if int(digit) == 1:
      //Do something
    elif int(digit) == 2:
      //Do something else
Code language: JavaScript (javascript)
That creates the baseline for a working IVR, although there are many other features that can be added with further code.
Time to Build an IVR System
These are only two of the methods you can use to build an IVR system with Python. Why not have a go for yourself, and build an automated system that can help to improve the experience for your service users, and free up more time for your employees.