Normally when we think of integrating an Artificial Intelligence model into a Web App, we immediately think of servers in Python or, even more often, cloud platform APIs. In this small guide, however, we want to explore a less trodden path: the possibility of including AI models directly in Web Apps for client-side use today thanks to JavaScript and the current Web Standards!
But before we launch into the fantasy and the code, let’s introduce you to the main characters of this story.

Meet the Transformers…
“Transformers” have revolutionized the field of natural language processing (NLP) and artificial intelligence: this architecture, based on the concept of “self-attention”, allows models to pay attention to different parts of a text simultaneously, thus capturing the relations between words even if they are distant in the sequence.
But what makes “Transformers” so special?
Unlike traditional sequential neural network models, such as recurrent neural networks (RNNs) or convolutional neural networks (CNNs), which process data sequentially, “Transformers” are able to process sequences in parallel, making processing much more efficient and faster.
Transformers.js – The Library to Run [Almost] All Models Available on Hugging Face in the Browser!
Among the many new tools and software related to AI, you might have missed a solution that combines the “Transformers” and the web world: it is the Transformers.js library!
This library allows you to run artificial intelligence models available in the Python world directly in your browser, thus opening up new possibilities in the field of web development and beyond.
With Transformers.js, you can easily incorporate powerful NLP models, such as GPT and BERT, but also Computer Vision tasks like image-to-text, depth-estimation, and much more, into your web applications, Node.js, or Electron!
All without the need to rely on external servers or cloud services since everything is executed inside the browser.
This feature, in addition to the obvious low infrastructure cost, introduces a complete level of privacy: sensitive data (such as health status or webcam images) may not leave the user’s device; indeed, after downloading the model, your web app will also work offline!
But how can we start using Transformers.js in our JavaScript projects? Keep reading to find out!
Now Let’s Experience the Thrill of Creating a True Web App Based on AI…
Here’s the most exciting part: putting into practice what we’ve discussed and creating a real web app based on artificial intelligence using Transformers.js!
In this tutorial, we will guide you step-by-step through the creation of a simple web application (an AI translator tool) that uses a “Transformers” based text generation model to translate sentences from Italian to English. You’ll see how easy it is to integrate Transformers.js into your project and start exploring the world of Artificial Intelligence in a creative and familiar way.
Prepare your favorite code editor and let’s tackle this simple AI translator step by step… like in a cooking recipe!
Practical Recipe for an AI Translator Integrated into a Web Page
For example, we will develop a simple translator that will use an AI model to translate from Italian to English with a click!
Requirements
You don’t need to know about AI, Python, or data science, just get by with vanilla JavaScript, HTML5, and CSS: the recipe is designed to be clear and accessible!
For example, we will not use any bundler but a simple /public folder to be served with your favorite web server.
Ingredients
For our web app, we will need three main ingredients:
A minimalist UI:
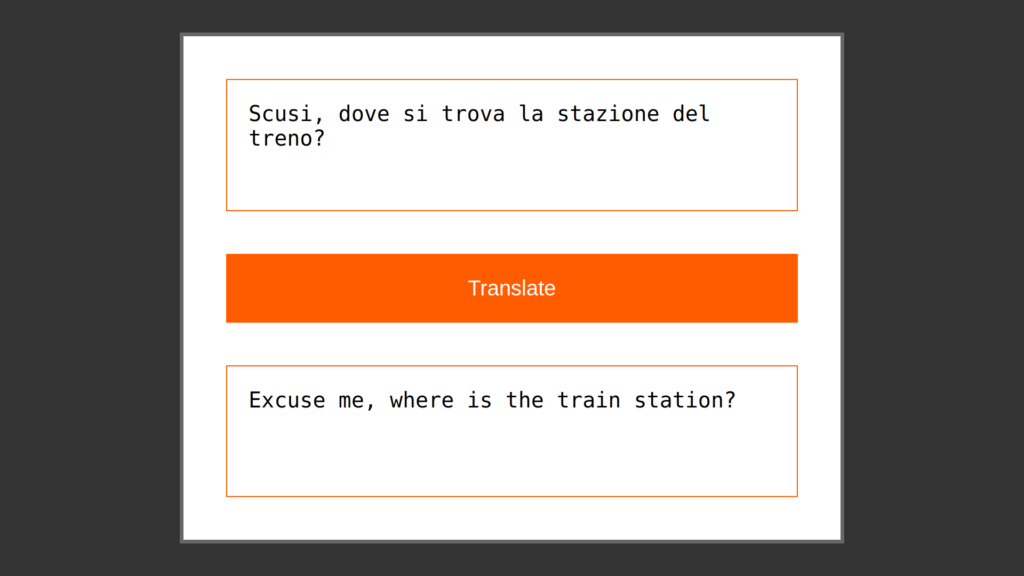
- A minimalist graphical interface for translation with an AI model
- A textarea where the user will write the text to be translated
- A button to start the translation
- A textarea to display the translated output
A web worker (loaded as a module): will contain our AI model and allow us to query it without blocking the user interface of the main thread.
A simple application logic: will be responsible for tying together the UI, the web worker, and the translation process.
AI translator – Procedure
Preparing the UI
Let’s create a simple HTML page with textareas for input and output, along with a button to start the translation.
<!DOCTYPE html>
<html lang="en">
<head>
<meta charset="UTF-8">
<meta name="viewport" content="width=device-width, initial-scale=1.0">
<title>Web based AI Translator</title>
<link rel="stylesheet" href="./style.css">
<script type="module" src="./app.js"></script>
</head>
<body>
<div id="container">
<form id="translation-form">
<!-- input to translate -->
<textarea id="italian-text" rows="6" spellcheck="false" required disabled placeholder="Italian text"></textarea>
<!-- button we will attach the event to translate -->
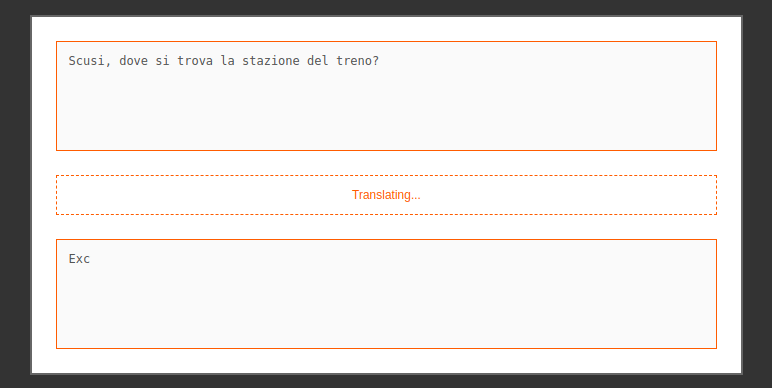
<button id="translate-button" type="button" disabled>Loading model...</button>
<!-- translated output (read-only) -->
<textarea id="english-text" rows="6" spellcheck="false" placeholder="English text" readonly></textarea>
</form>
</div>
<!-- include a progress bar to indicate when we are downloading the AI model (often > 50Mb) -->
<div id="progress-bar"></div>
</body>
</html>
Code language: HTML, XML (xml)Preparing the User Experience
Now that we have our index.html ready, it’s time to sketch out our app.js!
We will limit ourselves to defining two functions to enable and disable interaction with the user interface (being careful to wait for the HTML page to load).
🔮 We will need it later when we are waiting for the results of long processes performed by the Web Worker.
document.addEventListener("DOMContentLoaded", () => {
    const translateButton = document.getElementById('translate-button');
    const italianTextarea = document.getElementById('italian-text');
    const englishTextarea = document.getElementById('english-text');
    const progressBar = document.getElementById('progress-bar');

    const disableUI = () => {
        italianTextarea.setAttribute('disabled', true);
        englishTextarea.setAttribute('disabled', true);
        translateButton.setAttribute('disabled', true);
        translateButton.innerText = 'Translating...'
    }

    const enableUI = () => {
        italianTextarea.removeAttribute('disabled');
        englishTextarea.removeAttribute('disabled');
        translateButton.removeAttribute('disabled');
        translateButton.innerText = 'Translate'
    }
    // More code follows...
});
Code language: JavaScript (javascript)
Creating a Web Worker to Download and Run the AI Model
Since downloading the AI model files from Hugging Face can be lengthy and especially will be run by the user’s CPU, we must include a Web Worker in our project!
// Web Worker
import {
     pipeline,
     env
 } from "https://cdn.jsdelivr.net/npm/@xenova/transformers@2.17.1";

env.allowLocalModels = false; // If using models from Huggingface, this must be set

var translator;
var task;
var model;

const progressCallback = (data) => {
    self.postMessage({
        status: 'downloading',
        result: data
    });
}

const updateCallback = (beams) => {
    const decodedText = translator.tokenizer.decode(beams[0].output_token_ids, {
        skip_special_tokens: true,
    })

    self.postMessage({
        status: 'update',
        result: decodedText
    });
}

const resultCallback = (output) => {
    self.postMessage({
        status: 'result',
        result: output
    })
}

self.addEventListener('message', async (event) => {
    const message = event.data;

    if (message.action == 'download') {
        task = message.task;
        model = message.model;

        translator = await pipeline(task, model, {
            progress_callback: progressCallback
        });

        self.postMessage({
            status: 'ready',
            task: task,
            model: model
        });

    } else if (message.action == 'translate') {
        const output = await translator(message.input, {
            // Secret ingredient
            ...message.generation,
            callback_function: updateCallback
        });

        resultCallback(output[0].translation_text);
    }
});
Code language: JavaScript (javascript)
Adding the Web Worker to the App
Back in our app.js where:
- We will load the worker.js file, taking care to pass the option type: “module” allowing us to load Translator.js as an ES6 module 👩🎤
- We will define two functions to send two messages or actions to the web worker: download and translate
- We will define what to do when our actions produce their respective results: ready when the model is ready and result when the result of the model’s execution is ready (text translated in this case)
- We include the functions enableUI() and disableUI() to inform the user when the APP can interact and when not
- Extra: the web worker also informs us of the progress in downloads and to make it clear that the APP is doing something by updating its property based on the percentage of download –progress-bar-percentage
var aiWorker = new Worker('worker.js', { type: "module" });

const translate = (text) => {
    disableUI(); // This will take some time...
    aiWorker.postMessage({
        action: 'translate',
        input: text
    });
}

const download = (model) => {
    disableUI(); // This will take some time...
    aiWorker.postMessage({
        action: 'download',
        task: 'translation',
        model: model
    });
}

aiWorker.addEventListener('message', (event) => {

     const { status, result } = event.data;

     // Web Worker is informing us that...

     if (status == 'downloading') {
         if (result.status == 'progress') {
             // animated progress bar for download
             progressBar.style.setProperty("--progress-bar-percentage", result.progress + "%");
         }

     }  else if (status == 'ready') {
         translateButton.addEventListener('click', () => {
             translate(italianTextarea.value);
         })

         enableUI();
     } else if (status == 'update') {
         // secret ingredient
         englishTextarea.value = result;
     } else if (status == 'result') {
         englishTextarea.value = result;
         enableUI();

     }
 })

 download('Xenova/opus-mt-it-en');
Code language: JavaScript (javascript)
The Secret Ingredient
In the Web Worker and App comments, there are two points indicated as the secret ingredient… what is it?
When we create our “pipeline” we can add a callback that informs us of the model’s progress by giving us the partial output of the answer. This is an essential ingredient because otherwise, the user would not see the output until the end of the execution which can take even minutes.
From the user experience point of view, it will be essential to find interesting and creative ways to give people the illusion that our Artificial Intelligence is alive and thinking! 🎩✨🐇
By following these steps, you will be able to create a web app to translate text based on artificial intelligence!
Client-Side AI Model: Conclusions
There are many limitations to using this technology at this time: the heavy model files and the slowness of a simple CPU are certainly the most obvious! Moreover, many models cannot be run in the browser context.
However, I believe there are important aspects that make Transformers.js a great opportunity:
- It is based on perhaps the most ubiquitous technology of the moment, the Transformers, and is also developed within Hugging Face… it’s really the JavaScript cousin of the Python library 🤗
- You can make any model normally for Python compatible with a script (which transforms it into an optimized ONNX format): this means potentially having all models as soon as they come out!
- The parameters of the Python models are the same in Transformers.js so the documentation, once you’ve learned the key concepts, is also valid for JavaScript programmers
- Expands the ecosystem of AI models greatly, bringing them into PWAs, Node.js servers, and even AI-based Desktop Applications with ElectronJS… all well-documented even with use cases of React and other frameworks
- Zero extra costs for external platforms and APIs
- Its author, Xenova, seems to have very clear ideas and from this interview seems absolutely on the ball… and this seems to be a very promising aspect 🌟
- But above all, we are all waiting for the real superhero of the story: WebGPU
But we will talk about this in future articles starting from the next in this series: Running a real Large Language Model (LLM) client-side in the browser!