
Today, chatbots are implemented almost everywhere, including many websites. The IBM Watson approach allows us to easily integrate AI features and deploy a web chatbot in just a few hours.
In this article, we’ll put this in practice within IBM Cloud. We will set up a basic chatbot with a few predefined questions to start with. We will add information from a user’s manual to be automatically searched when the given question is not included in the predefined list.
The list of answers will be almost automatically enriched, refining the contents of the manual in a suitable way to be best searched by an AI service. This will make our chatbot able to automatically refine its own response performance.
All these opportunities are easy to set up through IBM Cloud Services.
IBM Cloud: free access
The first thing we need is access to IBM Cloud, to get our AI-based app up and running.
If you do not have an IBM Cloud account, register for a free trial account here.
We will see how to add an AI-driven answer to our chatbot. This feature, the “search skill“, is associated with a payment plan. You’ll be prompted to undertake a 30-day trial.You also need the Node.js runtime to finalize the chatbot.
Creating the Assistant instance
Once you access IBM Cloud, you’ll need to create the service instances. A full guide is available on IBM’s GitHub, while we’ll recap the most significant steps.
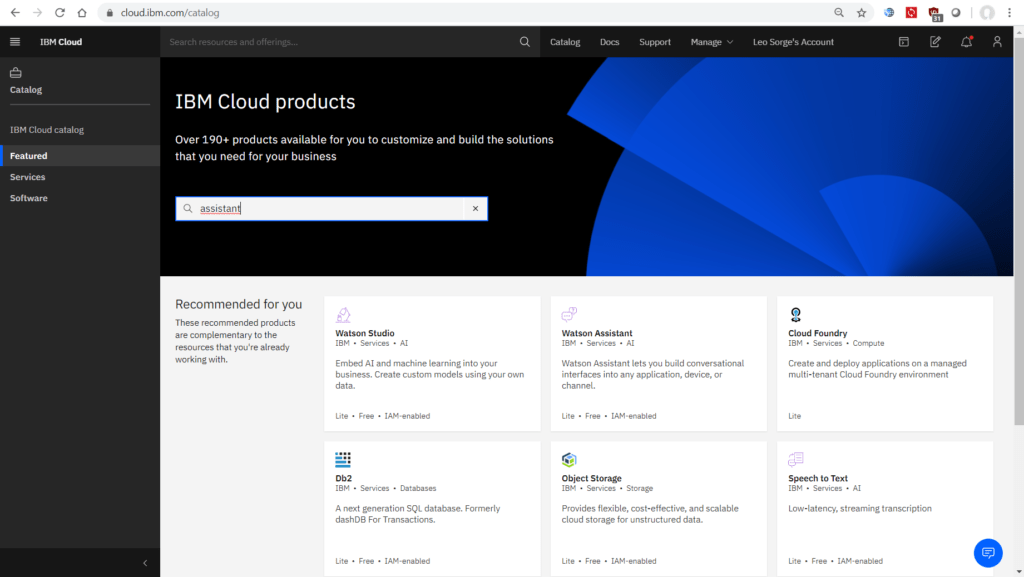
Locate the “Catalog” tab in the upper option bar, and click on it. The catalog page will show up: you can locate Assistant and Discovery by scrolling down through the options, but it’s probably shorter to use the internal search engine.
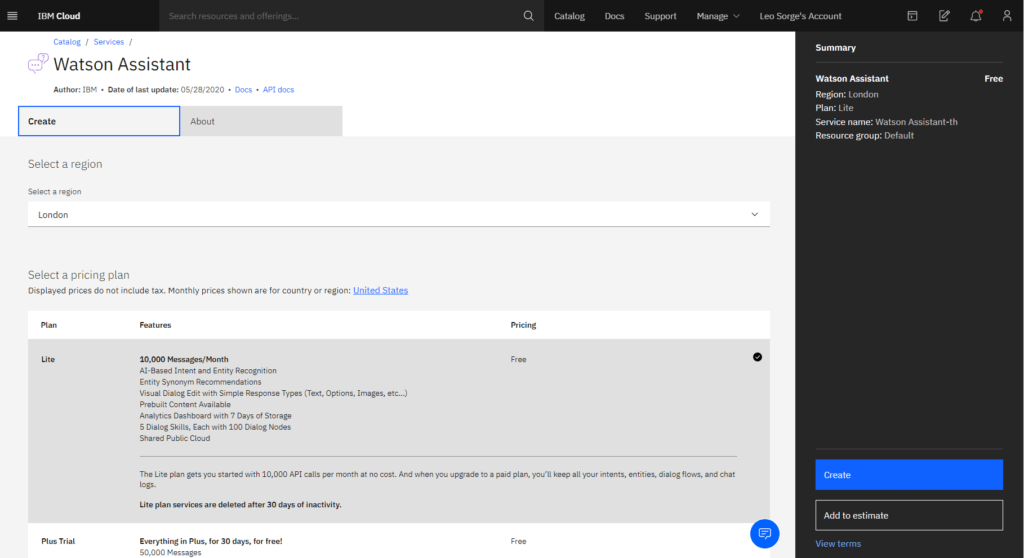
By clicking on the Assistant box, you will be prompted with a ready-to-use choice. Just double check all options (the region, and -at the end of the page- your service tags, should you need them), then click on the blue Create button, at the bottom right corner of the page.
In the skills section, by clicking on the three-box icon in the vertical left command bar, right under the dialog icon (for assistants), you will find a basic chatbot. Click on its box, named “Customer Care sample skill“.
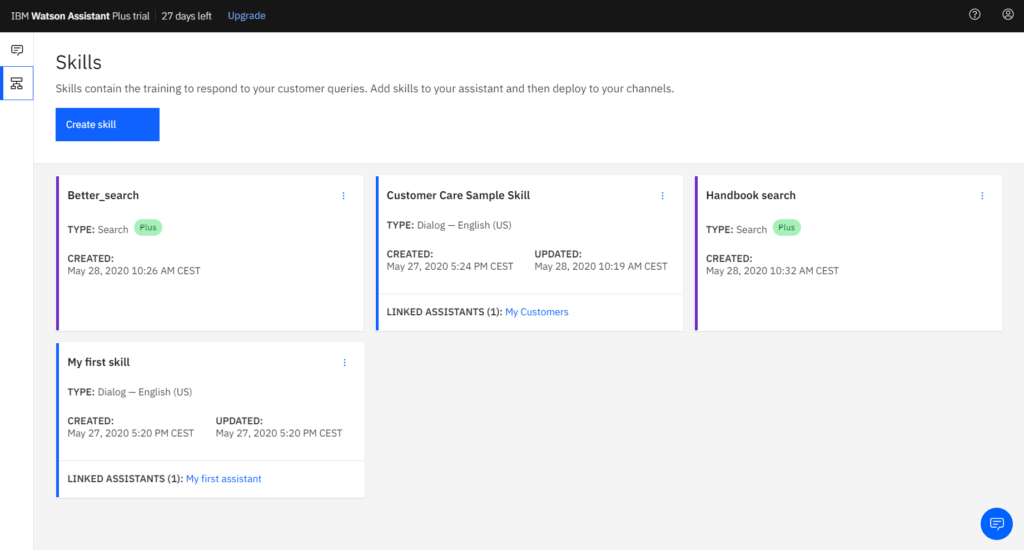
This basic chatbot allows for a few questions to be linked to their intents (meanings) so that the skill can accept questions, understand their intents, and answer with text or other kinds of output. The example allows for adding new questions and updating the output list until the basic chatbot is ready to be published. You can check the output by compiling a real-time question box during the questions/actions editing. This Watson service then generates your app, publishing it online at an automatic address.
At this point, you will have the following basic chatbot structure:

With this approach, users’ questions will most frequently be forwarded to the operator.
Creating the Discovery instance
To lower the number of questions that are not answered directed the service, it’s possible to add a search function inside a set of multimedia materials. We chose the free versions of the IBM Cloud services in this article, although this limits the available resources. Thus, we will limit the search function to one piece of content: a user’s manual (i.e. a PDF file). Unrecognized questions can be answered by searching for them within the user’s manual.
To implement this part, you need a search service (and, of course, a user’s manual).
The requested service is the Watson Discovery service. You can create it in a similar manner to the Assistant service.
On your IBM Cloud page, locate the “Catalog” tab in the upper option bar. Click on it to show the catalog page. In the search window, write “Discovery“, and a few options will appear.
Look for “Discovery – IBM – services – AI“, then click on its related box. You are now prompted with a ready-to-use choice. Double-check all the options, then click on Create to complete the service request.
Now we need a suitable PDF manual.
Choosing a data collection to search in
You can upload many different kinds of files. A good example can be directly downloaded with Git from the IBM repository:
git clone https://github.com/IBM/watson-assistant-with-search-skillCode language: PHP (php)From the project folder, you will need just two files: the PDF manual data/ecobee3_UserGuide.pdf, and a sample configuration file (env.sample) that will be helpful later.
The suggested guide is related to a thermostat device, so our new questions to the chatbot will have to be related to this subject.Launch your Discovery tool, go to Manage Data (on the left vertical bar click on the directory icon), then create a new data collection clicking on “Upload your own data“. It’s worth noting that you will be requested to upload the same file several times during all the qualification process for this manual to become suitable for the user’s answers.
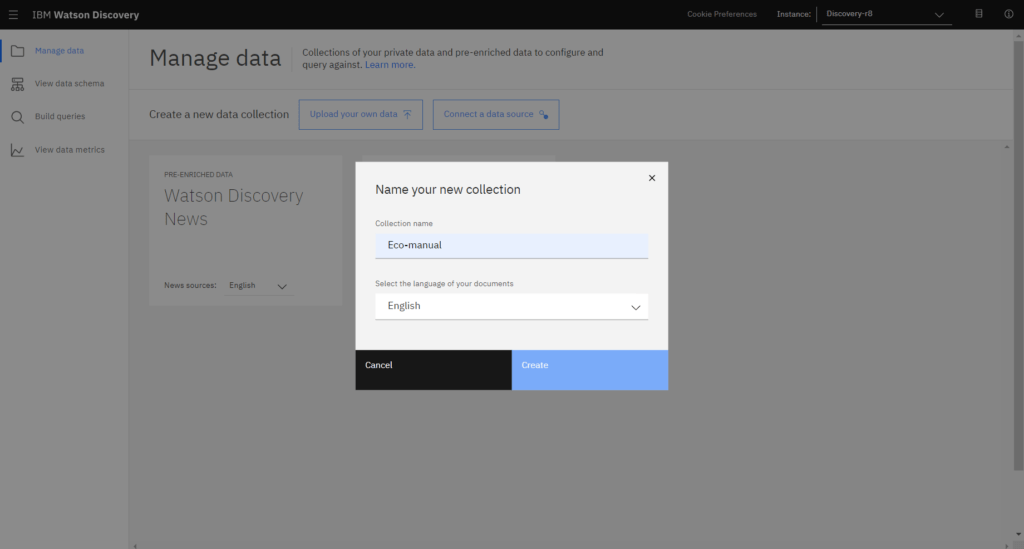
You can now upload the PDF file, as requested. A wait screen will be shown until the upload and the basic file processing is completed. A limit to the document size could apply depending on your plan.
You can add many different files to compose a collection to search for your own service. Apart from this you are allowed to access the Watson Discovery News, a special collection of press clips ready to use. Watson Discovery News is an always-updated collection of articles that you can easily analyse to extract specific-subject entries, general trends, sentiment analysis, and also more sophisticated analysis.
Please pay attention to the upper limit for your data collections, according to your plan: in the provided example, the limit was set to three data collections. You can also try with image sets if your IBM Watson service plan allows you to do so.
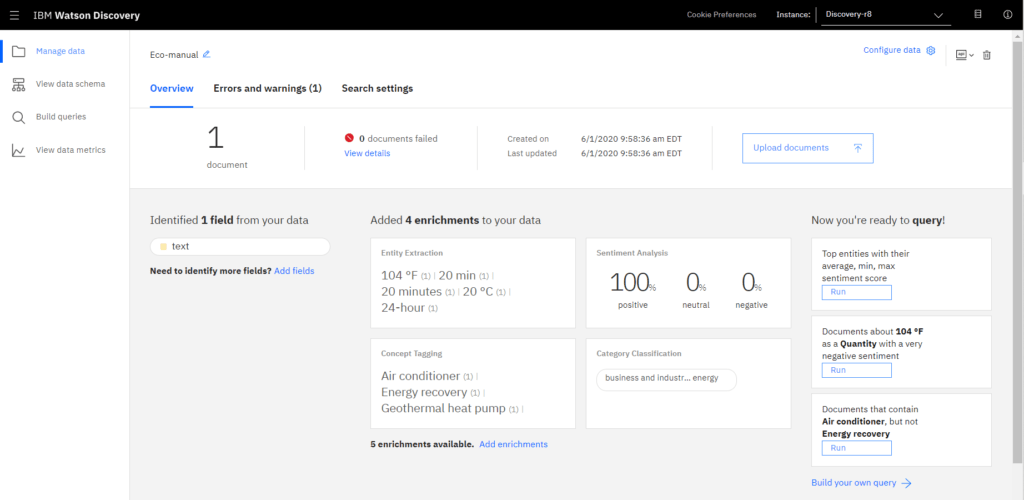
Let’s go on using the Ecobee’s user’s manual. Open the Discovery screen and give a look to the first analysis automatically performed by the AI service. On the left vertical bar, click on the magnifying glass icon to open the query screen.
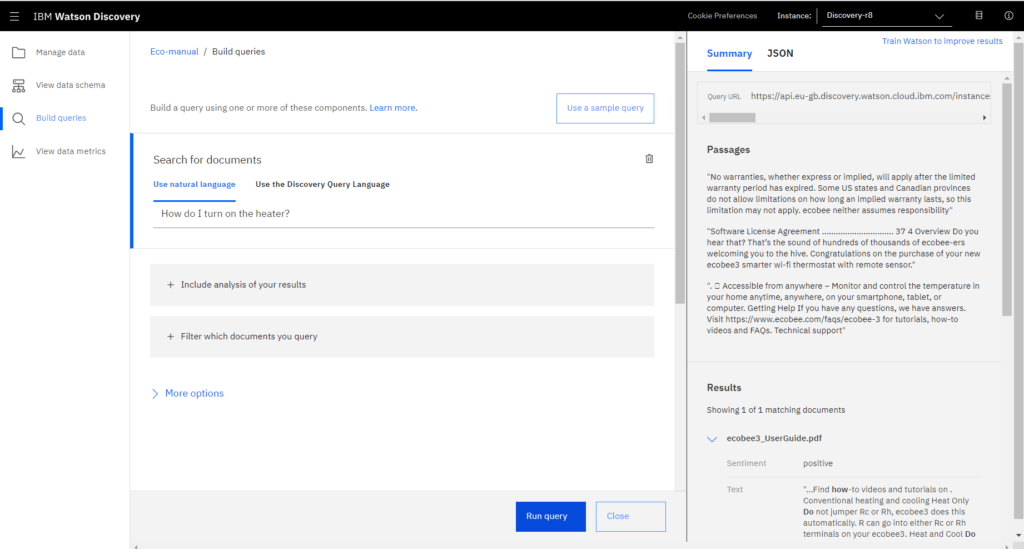
Click on “Search for document” and a window opens up with the pre-selected “natural language” option. We avoid using the Discovery query language in this first example. You can then place your question inside the text line at the bottom of this window. The answer will appear on the right vertical window. You can switch between text mode (Summary) and code mode (JSON).
You can ask related questions to thermostat functions for the best results, but it can be fun to ask different questions to see how the system behaves.
The proposed question is “How do I turn on the heater?”. Click on Run Query at the right-bottom spot of the screen, and some results will appear, related to the proposed question and bad formatting. You get some answers, but they are not very good.
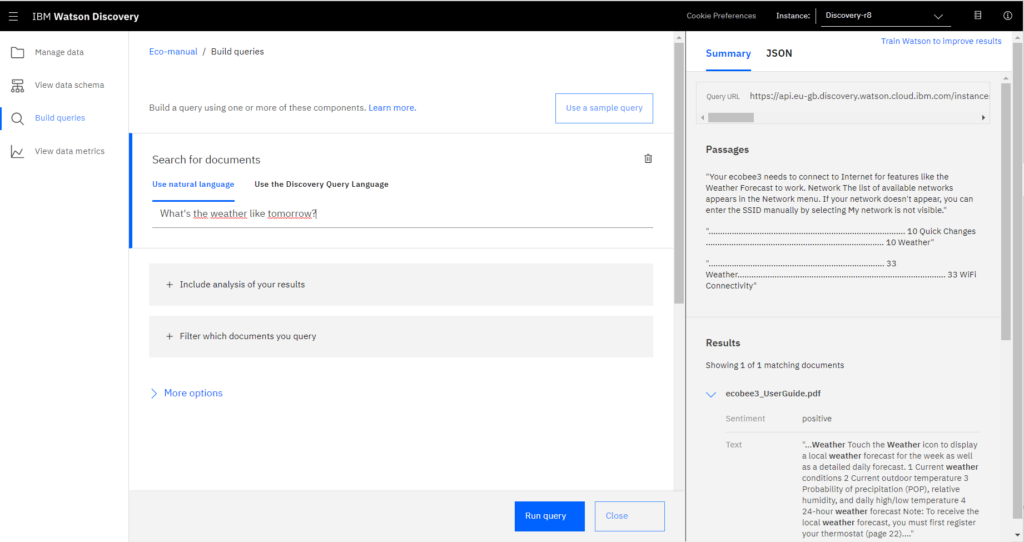
You can also ask unrelated questions to the thermostat functions and the search system will make its best anyway!
Smart Document Understanding
Going back to our goal, we need to get better results from the proposed document. This is where the Smart Document Understanding feature intervenes.
Smart Document Understanding allows us to refine the contents’ formatting to be best searched by an AI service. In short, you’ll upload a content, specifying some of its features -the same way you do with a word-processing software- so as to train the AI engine to best index its parts. The trained engine will sort out very good matches with the questions the user will ask your chatbot.
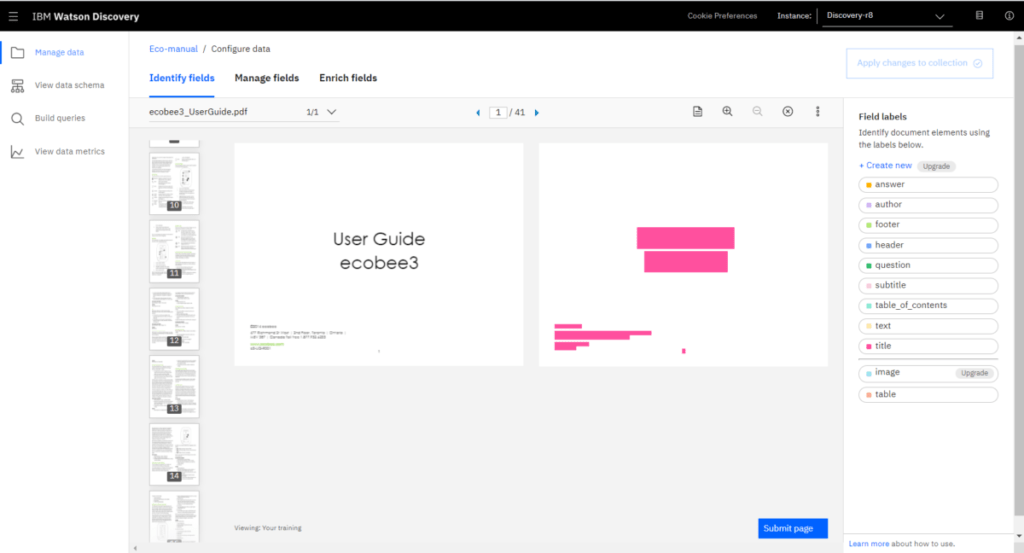
From the Discovery panel, locate the Configure data icon (top-right) and click on it. The “SDU Annotation Panel” will show up, divided into seven major areas:
- the bar with document fields actions (Identity, Manage, Enrich), just down the screen heading:
- a document summary, sliding top-bottom on the left;
- the true document;
- a formatting-oriented version of the document;
- a list of attributes for the document components, sliding top-down menu at the right;
- the “Apply changes” button, top-right;
- the “Submit” button, bottom-right.
Smarting the document through Annotations
You have to give “annotations” to the AI engine, i.e. more details to help it extract the right information. You can annotate the original file as deep as you want, but there is a minimum of information that is needed to make this training useful to the engine. Annotations are given by clicking on one item on the right menu (the mouse pointer will become a cross) and left-clicking the mouse button over the page part to select, then releasing the mouse button.
The list of disposable parts of content are the main title (on the first page), the page numbers (footers), the table of contents (table_of_contents), the final warranty and licensing information (you can call them footers), and the images (in this example you can cut them all, clicking on the superimposed X’s).
The list of interesting parts is limited to two kinds of items, the subtitles and the body text. All relevant text, i.e. the remaining sentences after the aforementioned annotations, should be marked as text. All secondary headers will be marked as subtitles.
You must then submit the annotated pages to the engine. A check mark will be superimposed on the newly annotated pages in the leftmost document summary.
Once you have annotated all the pages, you can move one step further and manage the selected items. The AI system learns from your annotation, so the next time you are refining the document with your new annotations you find many new items already categorized. It’s an easy way to proceed!
Click on the “Manage Fields” tab. A panel will be shown, sporting three main features:
- a list of attribute switches (left);
- the document splitting rules (center);
- the “apply changes” button (top-right).
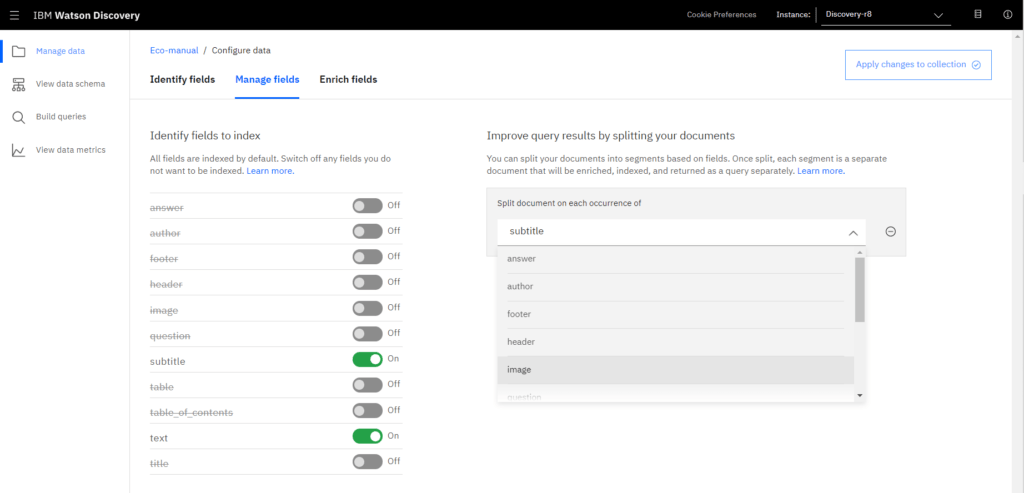
Starring text and subtitles
Your task is easy and intuitive. Text and subtitles are the relevant parts of the document. Unselect all non-relevant parts of the document to be used as answers to a user’s question, then split the document into more components (this will help the search, thus the results), then apply changes.
You will be requested to upload the original Ecobee manual each time you add new steps in your refining process.
Congratulations! You just allowed your AI service to have a smart document understanding. The next step is allowing your chatbot to use the smart manual version as a data source to find useful answers to your users’ questions. This step needs one more feature: the search skill.
A refined chatbot skill
Your new goal is now to create a chatbot skill that uses the refined manual contents to improve the search results and then the overall quality of the chatbot.
Let’s go back to our customer care chatbot. Let’s see a more detailed view of the same introductory screen we saw earlier in this article, presenting the basic structure of the chatbot:
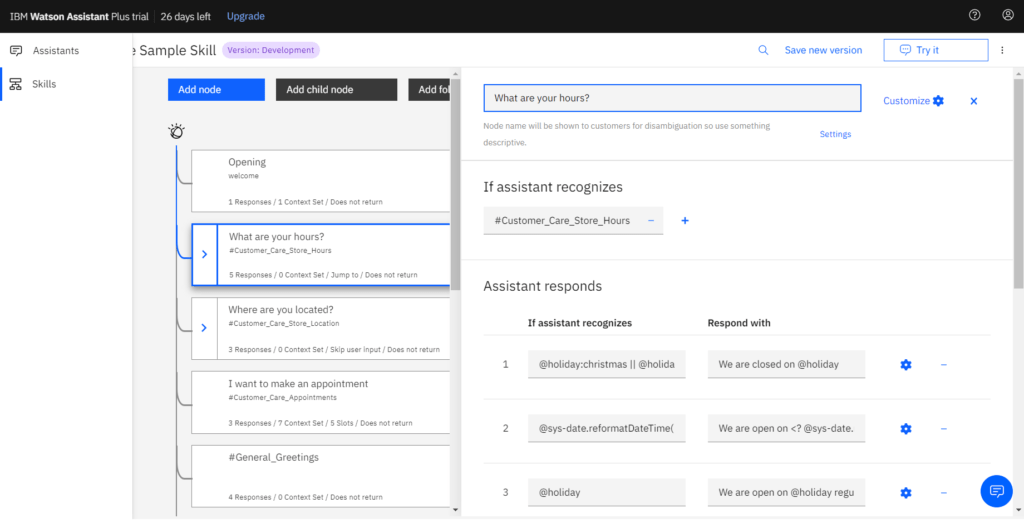
This new view is obtained by clicking on one of the possible questions, providing an option of the possible outcomes.
However this is only basic structure of a chatbot. What if we want to add a new possible answer to be intercepted inside the SDU-annotated users’ manual? This task will be performed adding a new goal to the possible search outcomes of the chatbot and making it one of the final nodes of the chatbot list of answers.
We will name the new task as “Product_Information” and the new node as “Ask about products“.
Go back to the skill screen and click on the Customer Care example. You’ll go to the intent page. In the conversational user interface jargon, an “intent” is the user’s goal when asking questions to a chatbot. Any intent can be associated with many different ways to ask for the same goal.
The list of intents associated with your sample chatbot will show up as follows:

Create a new intent by first clicking on the “Create Intent” blue button, located at the top-right spot on the screen. The intent-creation form asks us for the name and the description of our new intent.
Compile the Intent name field with “#Product_information“. You can add a description of your intents, if desired. Provide some examples of the possible queries the customer could ask. For example:

Now, add this intent as a node. Locate the left vertical command bar starting with the “Intent” tag and click on the “Dialog” tag. The well-known basic structure of the chatbot appears. Scroll down the dialog boxes, vertically listed just aside the command bar, and click on the “What can I do” dialog box. The users’ manual search will be performed at this point as a subsequent node of this main node.
Click on the “Add node” box. A form will appear on the right. You need to name it (“Ask about products” will work fine), then tell the system your intent name in the “If assistant recognizes” (it is #Product_Information), then activate the Assistant’s drop-down menu and select “Search skill“.
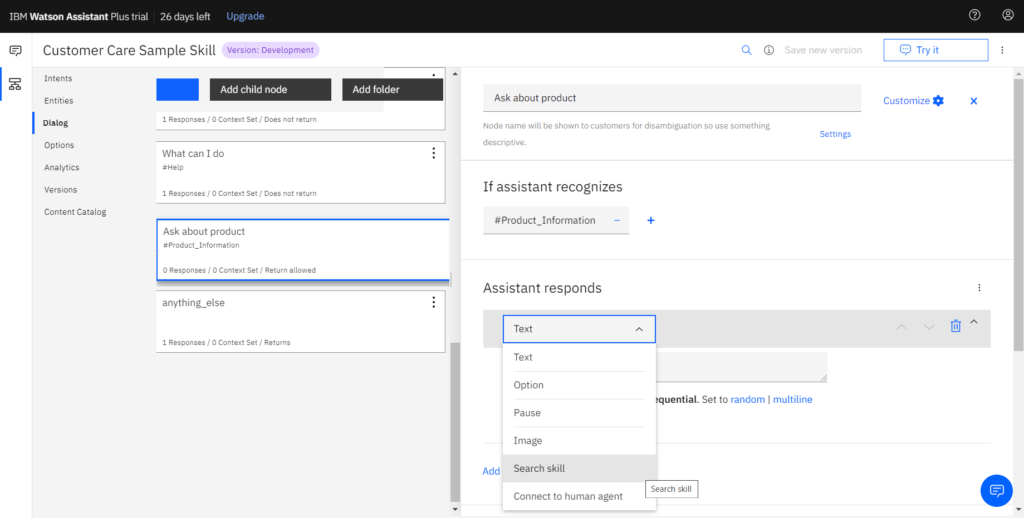
Watson Assistant on IBM Cloud only offers the search skill on a paid plan, but a 30-day trial version is available if you click on the Plus button.
Now you need to add the search skill feature to your node. You have to go back to the Watson Assistant’s screen to do this. Click on Watson Assistant (top-left of the screen), then select your chatbot’s description box. The destination screen shows the “Add search skill” button, located in the right-bottom spot.
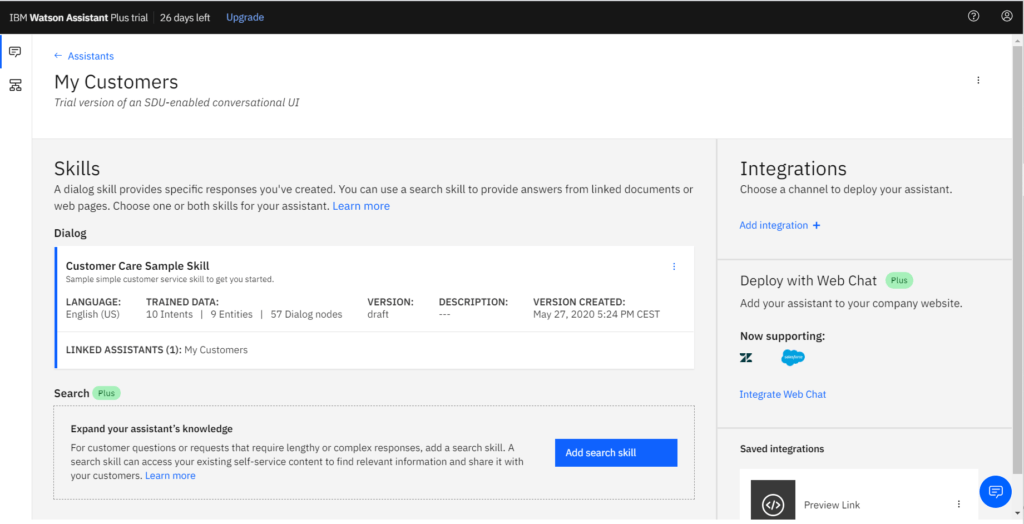
You now are in the configuration panel. Here, you tell the search skill what kind of field will be given the user as output. You only leave “text” and “subtitles” in your Smart Document.
Understanding pre-processing
Locate the Body on the panel and choose “Text“, then click on the right-bottom “Create” button.
Now when the dialog skill node invokes the search skill, the search skill will query the Discovery collection and display the text result to the user.
Now, select the Search Skill and turn on the Enabled switch.

Testing the Assistant Tooling
From your assistant panel, click on Add Integrations in the upper right box.
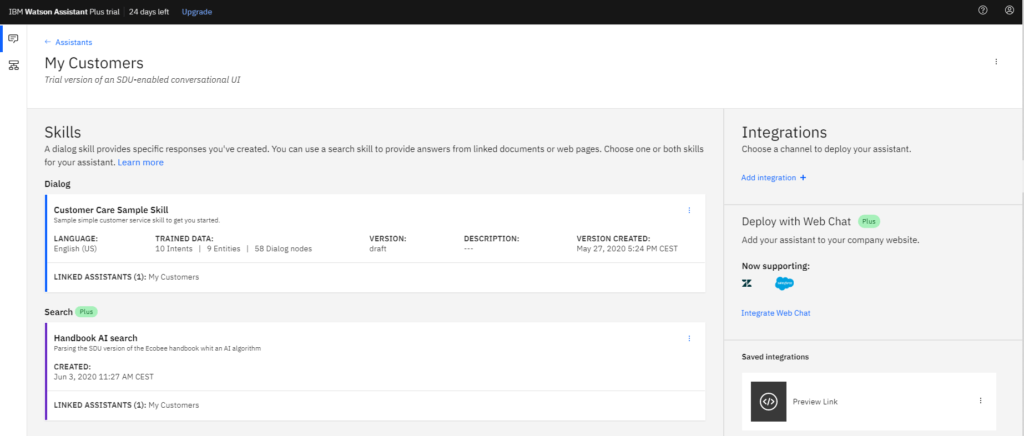
Now click on the Preview box:

This procedure will generate a link to test your AI-driven chatbot.

Testing the chatbot
Your full-fledged demo version is ready! Try some easy questions, then turn to the list of questions provided in your “Product information” added node. You’ll see that many more answers will be prompted by the AI-driven search skill, enabled by the SDU refinement. Not all of the results are perfectly formatted, but you can improve them by working longer on the SDU, or adding more suggested questions in your added node, and by many other ways.
Distributing the chatbot
This is only a test version of the AI-driven chatbot. Some more editing of the configuration file env.sample (as introduced above) may be required at this point to complete the service. If you want to learn more about this process, please refer to the full tutorial starting from this point.
A test version is a fantastic way to begin your journey into chatbot building, but of course, a full version of IBM Cloud services is the best choice for providing a chatbot in any production environment.


