Machine learning is the primary methodology for delivering AI applications. In previous articles, I discussed the main reasons behind moving machine learning to the network edge. These include the need for real-time performance, security considerations, and a lack of connectivity. However, ML models typically require powerful hardware to run efficiently. Fortunately, in recent years, MCUs have become ever more powerful, alongside the release of new frameworks enabling edge ML. TensorFlow Lite, in particular, has gained significant traction.
The last article discussed choosing a suitable platform for your edge ML project. It also explored some of the limitations imposed by TensorFlow Lite. In this article, we look at a practical example of running a TensorFlow Lite model on an NXP i.MX RT1050 EVK. Specifically, I’ll show how you can perform gesture recognition using the built-in accelerometers and a simple neural network.

Gesture recognition
Gesture recognition is a growing field in human-computer interaction using a combination of sensors and algorithms to identify specific human gestures. It enables many HCI applications ranging from controlling your car stereo to interactive gaming. It can even identify individuals based on the different ways they hold and use a device.
Applications of gesture recognition
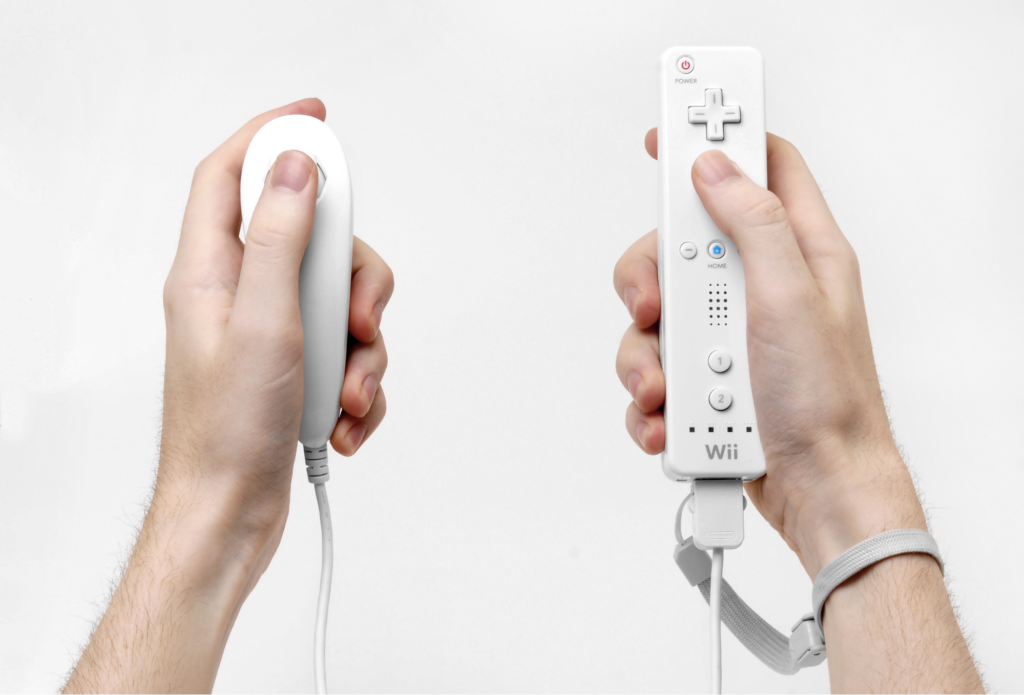
One of the earliest well-known applications of gesture recognition was the Nintendo Wii. The Wii used hand-held accelerometers enabling players to interact with various virtual sports events. It was only able to detect large gestures, but that was ideal for playing virtual sports like tennis or golf.
More recently, we have seen a rush to install gesture recognition as a safety feature in cars. Many motoring accidents are caused by the driver being distracted, one of the most frequent distractions being the audio system. Gesture recognition allows the driver to control the system without taking their eyes off the road: waving in a specific pattern to skip a track, increase volume, or change channel.
Techniques for gesture recognition
There are three broad forms of gesture recognition. The first relies on detecting movement in a sensor’s field of view. The second uses accelerometers within a device being held or worn by the user. The third uses computer vision to process the input from a camera.
IR sensors
IR movement detection has existed for decades and is still widely used in burglar alarm systems, for example. However, this sort of movement detection is binary. That is to say, either it detects movement or it doesn’t, which is not sufficient to enable gesture recognition. Instead, a time of flight sensor is required. These send out pulses of IR energy and measure the time for the reflected pulse to return, thus identifying simple gestures.
Accelerometers
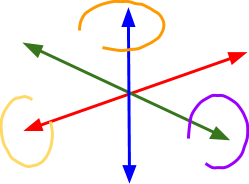
Our world is full of accelerometers: in mobile phones, in video game controllers, even in TV remote controls. Modern accelerometers are typically 6 axis, and often incorporate other sensors, providing data on movement in the XYZ directions, along with pitch, yaw, and roll. All of which can be used to determine gestures.
Computer vision
The most powerful approach for gesture recognition involves the application of computer vision. Here, you train a set of ML models to identify a hand in a video, track its movement, and recognise gestures. This approach has two key advantages over the other techniques: it doesn’t require the user to be holding a physical object (as is the case with accelerometers), and it can work at much longer ranges than systems based on time of flight sensors.
Time of flight cameras
One of the newest approaches for gesture recognition takes advantage of time-of-flight (ToF) cameras. These devices combine a camera with the ability to measure the distance to an object. They provide the ability to create 3D models of the environment without the need for expensive LIDAR scanning technology. As a result, they are perfect for recognising complex gestures at a distance.
Machine learning for gesture recognition
Machine learning is one of the most flexible techniques for enabling gesture recognition. It allows the identification of complex gestures yet is agnostic to the person making the gesture. ML models can take inputs from multiple different sensors and can cope with noisy data, outperforming the purely algorithmic approach taken by systems like Nintendo Wii or in-car audio. So, how do you create a machine learning model for gesture recognition and port it to your edge device?
A practical example of edge ML
The previous article explained the steps needed to create a TensorFlow Lite model and port it to a device. Now let’s see what this looks like in practice using a simple gesture recognition model.
This example uses the available from and one of the most powerful MCU boards in its class. It is based on an ARM Cortex 7 processor running at up to 600MHz. The board specification includes:
- Processor: MIMXRT1052DVL6A processor clocked at up to 600MHz
- Memory:
- 256 Mb SDRAM memory
- 512 Mb Hyper Flash
- 64 Mb QSPI Flash
- Footprint for QSPI Flash
- TF socket for SD card
- Display and Audio:
- Parallel LCD connector
- Camera connector
- Audio codec
- 4-pole audio headphone jack
- External speaker connection
- Microphone
- S/PDIF connector
- Connectivity:
- Micro USB host and OTG connectors
- Ethernet (10/100T) connector
- CAN transceivers
- Arduino® interface
- IoT sensors: FXOS8700CQ 3D Accelerometer and Magnetometer
This board is ideally suited for running sophisticated and powerful ML models at the edge. It is capable of handling large neural networks, making it suitable for image recognition tasks.

Selecting a model
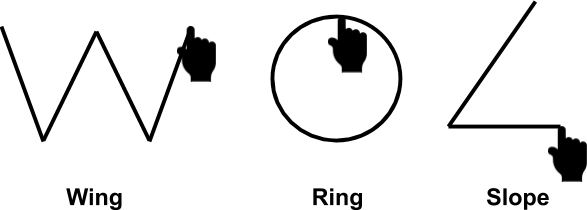
You could choose to create a model from scratch. However, this is only worthwhile if you need to use a non-standard sensor or identify unusual gestures. Typically, it’s easier to find an existing model and retrain it. An excellent starting point to find existing models is Model Zoo – a vast collection of ML models you can use for free. However, in this case, we want to find a model that converts accelerometer readings into gestures. Currently, there is no suitable model in Model Zoo. Instead, we will use one of the sample models provided for TensorFlow Lite. This example is called Magic Wand and is trained to recognise the three gestures shown below.
How to build your edge ML model
The first step is to set up your development environment. I recommend using NXP’s MCUXpresso, which is based on Eclipse. You will also need to build and download a suitable SDK for your development board. This requires you to create an account on the NXP website.
When you are creating your SDK, make sure you remember to select the correct board and include the eIQ, ISSDK, and sdmmc modules. These ensure your SDK can read from the accelerometer, provide native support for neural networks, and enable SD card IO.
Now install your SDK into MCUXpresso and create a new project called Magic Wand. Use git to clone the Magic Wand repository to the correct project folder on your local system.
Converting the ML model to TensorFlow Lite
The current model is written for TensorFlow. Using the TensorFlow Lite Converter, convert it to TensorFlow Lite FlatBuffer format – an efficient flat structure for storing hierarchical data.
In brief, the steps needed are:
- Using the Python API, convert the model to TensorFlow Lite FlatBuffer. You need to import TensorFlow and use the tf.lite.TFLiteConverter.from_saved_model() command.
- Convert the FlatBuffer to a C byte array. The easiest way to do this manually is with the Linux xxd command.
- Integrate the C++ Library. You need to include the TensorFlow Lite C++ library in your build.
- Deploy the model. You can choose to flash the model into the evaluation board’s flash memory. Alternatively, you could load it onto an SD card.
Building the model
When building your model, it is advantageous to set your development board as the build target as this ensures:
- The IDE handles the process of converting the TensorFlow model to TensorFlow Lite and packaging it as a FlatBuffer.
- The IDE calls the correct SDKs for the board. This automatically includes the eIQ SDK, together with a large selection of machine learning resources and libraries, and ensures the TensorFlow Lite library is loaded.
- The IDE can communicate with the board’s debug port to read debug information.
Within MCUXpresso, click on the build icon to initiate all steps needed to convert the model and load it to the development board. As with all Eclipse-based IDEs, the build icon is a small hammer 
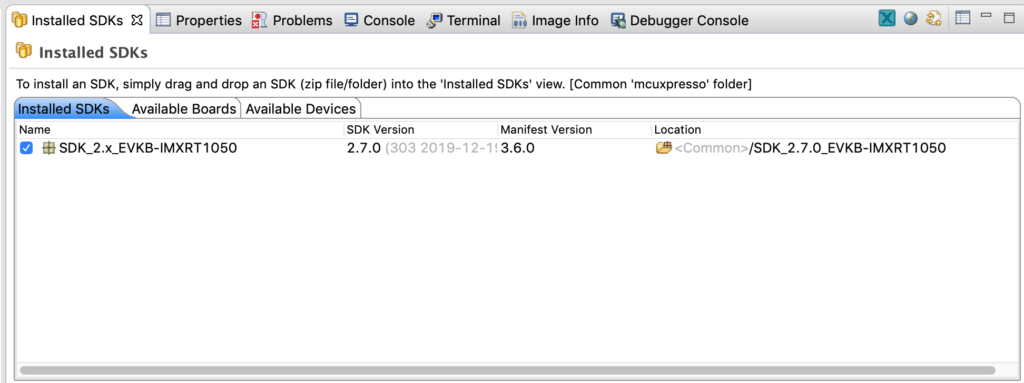
At this stage, you may encounter some problems if you didn’t include the correct SDKs in your download or forgot to install them in the IDE. If that is the case, go back to the SDK download page and make sure you select all the required elements. Download the SDK package again. Now, in MCUXpresso, go to Window > Show Views > Installed SDKs which opens a new window in the IDE. To install the SDK, drag and drop the zip file into this view.
Running the model
The Magic Wand model should now be loaded on to your evaluation board. As soon as the board is powered up, the model should start running and be ready to test. This requires you to connect to the board’s serial port using PuTTY or a similar terminal emulator.
Connecting to the serial port
Plug the board into your computer using a USB cable connected to the debug port. If you used MCUXpresso to build and deploy the model, the board should already be connected. Now use Device Manager to identify which USB port it is connected to and set up your terminal emulator with the following settings:
- Port: Find the correct port for the USB cable connected to the board
- Baud Rate: 115200 bits per second
- Data Bits: 8
- Stop Bits: 1
- Parity: None
- Flow Control: None
If all is well, you should see the words Magic starts! appear on the screen.
Testing gesture recognition
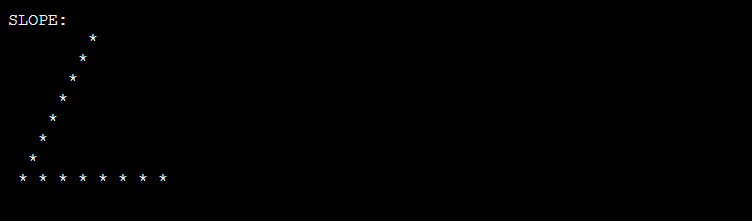
Pick up the board and draw a letter W in the air. You should see the following appearing on the terminal emulator:

Now try drawing a circle in the air. This time you should see:
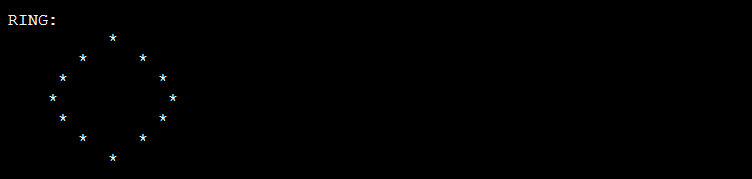
Finally, try drawing an angle in the air:
Taking things a step further
Clearly, it’s impractical to wave a large board about when using the Magic Wand code. Fortunately, you can buy much smaller devices capable of running this code. Then, with a little ingenuity and maybe a 3D printer, it’s possible to create a real wand. Alternatively, companies such as Kano are producing suitable hardware, designed to teach children how to code. However, since the wand includes an accelerometer and is Bluetooth enabled, it is easy to see how you can use it with the NXP MCU board if you install an Arduino Bluetooth shield.
Conclusions and what next
Edge ML is an essential tool for enabling gesture recognition. Modern MCUs are powerful enough to run complex ML algorithms in real-time, enabling gesture recognition systems based on accelerometers, time of flight detectors, and even computer vision systems. The next article will show how edge ML can be used for person detection and explain how this can be extended to full facial recognition.