This series is exploring the rationale for moving machine learning to the network edge. This article looks in more detail at image recognition, one of the prime use cases for ML at the edge.
As explained in previous articles, there are many use cases for machine learning at the network edge. So far, I explained the rationale for running ML models at the edge. introduced some of the hardware and tools, and gave a practical example of implementing gesture recognition. Here, I explore image recognition in detail. You will learn what image recognition is and how convolutional neural networks help implement it. At the end, there is a practical example of implementing image recognition on a Microchip SAM E54 MCU.
Why we need image recognition at the edge
Nowadays, everyone is familiar with image recognition. It enables autonomous driving. It powers facial recognition systems. Medics can even use it to diagnose breast cancer from mammograms. Many of these applications need to run in real-time. They cannot rely on network connectivity and often they need to run in lightweight hardware with low power draw. As a result, they are a perfect use case for ML at the network edge.
All these applications rely on ML models, such as convolutonal neural networks (CNNs). As explained below, these algorithms allow a computer to pick out and identify features within an image. However, CNNs are complex, requiring lots of parallel operations to run efficiently. Fortunately, modern embedded MCUs are able to run quite large neural networks. But let’s start by looking at the history of CNNs and image recognition.
A brief history of image recognition
Image recognition may seem quite new. It’s only a few years since the first reports about computers learning to recognise cats. But in fact, image recognition can be traced back many decades. Of course, the original image recognition systems were nothing like as powerful as today. But they were still able to perform some useful tasks.
The artificial neuron
The underlying element in any neural network is called an artificial neuron. These data structures are loosely based on human neurons. Each neuron takes a number of weighted inputs and combines them using a transfer function. It then uses an activation function to determine whether to fire or not. This is shown in the following diagram.
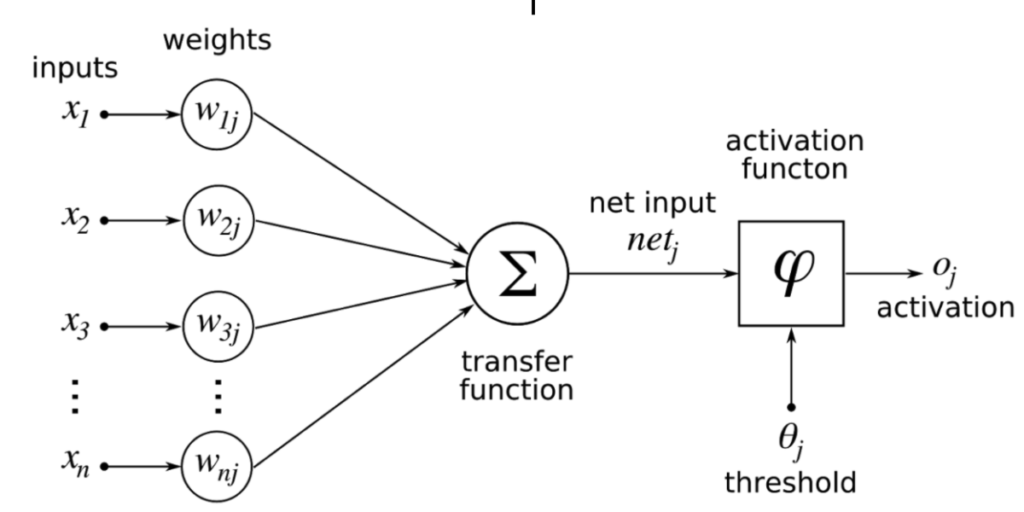
The transfer function is typically a simple sum or product. The activation function can be one of several operators including a step, identity function, or logistic function.

If the output of the activation function exceeds the threshold, the neuron fires, otherwise it remains dormant.
From neurons to neural networks
By itself, an artificial neuron is not much use. But they are very powerful when you combine them into neural networks. All artificial neural networks (ANNs) consist of at least 3 layers: an input layer, 1 or more hidden layers, and an output layer. The number of inputs depends on your data. The ANN classifies the input data into 2 or more outputs. When you feed in your data, only one output neuron should activate. Which neuron fires depends on the weights you set in the network. The process of setting these weights so that the correct output fires is called training.
Using CNNs for image recognition
Convolutional neural networks are a form of deep neural network widely used for image recognition. They are deep because they utilise multiple hidden layers. They are convolutional because many of their hidden layers convolve or simplify the input image into a feature map. For instance, you might take a 64×64 pixel bitmap and reduce it to a 4×4 matrix showing which areas of the image were more dark and which more light.

One of the fathers of image recognition is the French computer scientist, Yann LeCun. In the late 1980s, he worked at AT&T Bell Laboratories in New Jersey. A key project at the lab looked to create a system to recognise hand-written zip codes on envelopes. The aim was to automate the sorting of mail. In 1989, LeCun’s colleagues published a paper showing how to use a neural network to perform this task. However, this network had to be laboriously tuned by hand. LeCun made a huge breakthrough by applying a process called backpropagation to the problem.
Backpropagation involves taking the outputs and working backwards through the CNN changing the weights of each neuron, the aim being to reduce the mean error each time. There are numerous approaches for doing this, such as gradient descent. You can read more about it in this tutorial on Towards Data Science.
Steps for image recognition
Modern image recognition divides the problem into three steps. Detection (or localisation), classification, and segmentation.
Detection/localisation
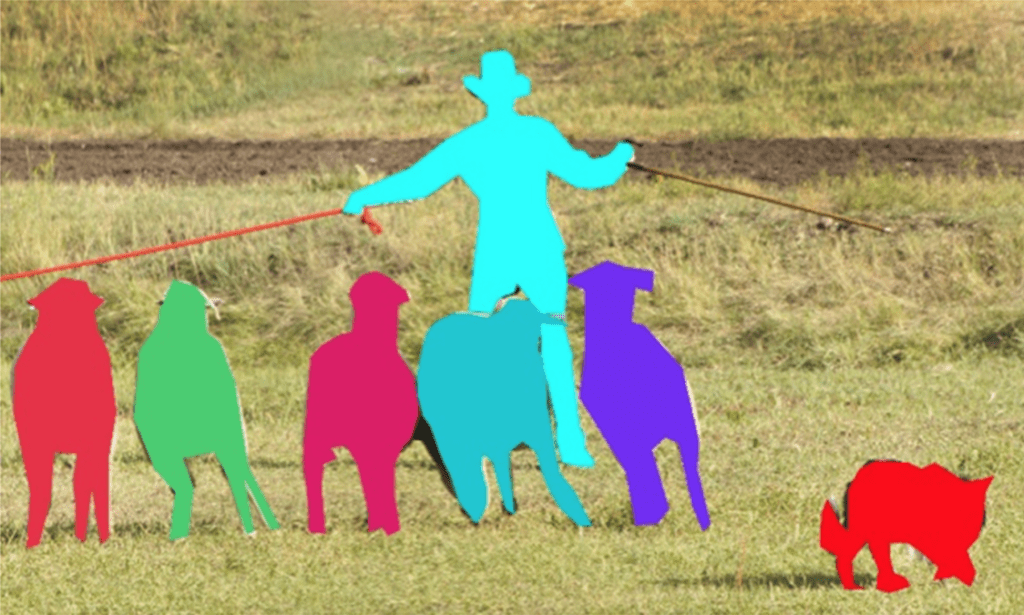
This involves identifying different features within the image. In the figure below (from a Facebook Engineering blogpost) the system has identified a number of different elements.

There are numerous approaches to detection and localisation. The aim is to identify whether adjacent pixels are related to each other. In the handwritten numeral 3 example above, this is relatively easy. You just identify which areas are black and which are white. But in a detailed colour image, this gets more tricky.
Classification
Next, you try to classify each region you have identified. This is where machine learning really comes to the fore. It allows you to train your classifier against a large, labelled dataset. In the image above, the classifier is able to tell that there are 3 classes of object. It is thus able to determine that the image contains a man, a dog, and 5 sheep.
Segmentation
The final stage is to understand how the items relate to each other. For instance, is the man in front of or behind the sheep? This process is known as segmentation or semantic image segmentation. The image below shows the result for the picture of the shepherd.
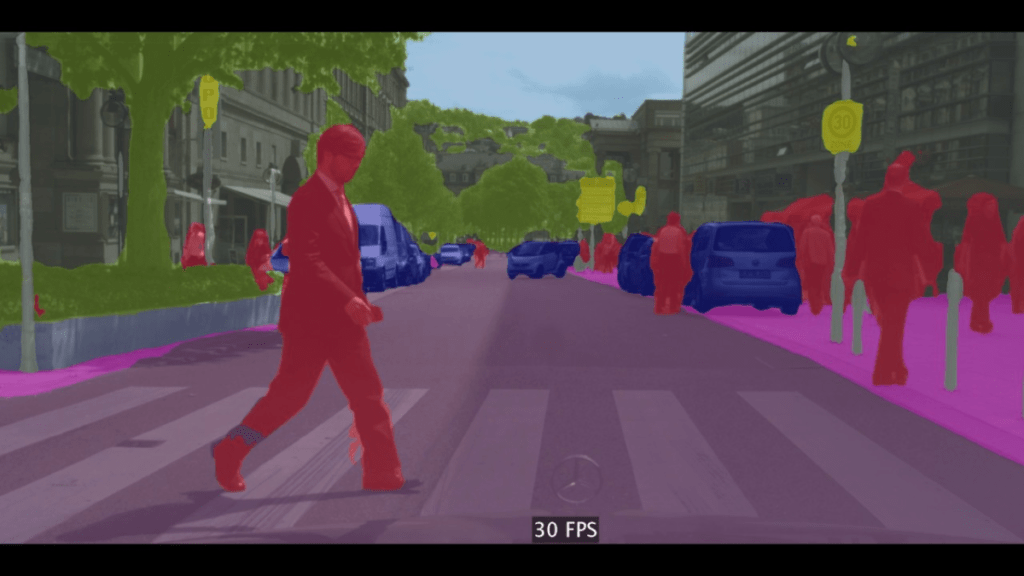
This gets much harder when you have complex images like a typical street scene. Self-driving vehicles need to do real-time segmentation as shown in the following frame taken from Hengshuang Zhao’s YouTube video ‘ICNet for Real-Time Semantic Segmentation on High-Resolution Images’.
Once a neural network has been trained to perform image recognition, you can deploy it on any suitable hardware. Here, we are interested in deploying image recognition at the network edge. The rest of this article explores how to do this in practice.
A practical implementation
As we already saw, image recognition requires a trained neural network or other machine learning model. In this example, we will create a simple person-detection model. For this, you need the model, a platform to run the model on, and a camera or other image source. For this example, I have selected the Microchip SAM E54. Or, more precisely, the SAM E54 Xplained Pro Evaluation Kit. This MCU evaluation board is ideal for developing ML models:
- ATSAME54P20A 32-bit Arm® Cortex®-M4F Microcontroller
- 256MB Flash memory
- An SD card slot
- 2 USB ports (1 debug)
- PCC camera interface
- Headers for Xplained Pro Extension Kits
- A built-in high-accuracy current meter (for precise power profiling)
Setting up the board
Before you do anything else, you need to make some modifications to the evaluation kit board. For efficiency, the board reuses the same I/O pins for multiple connectors. By default, the PCC interface is disabled. These steps enable the PCC interface and allow you to connect a suitable camera, such as the Seeed Studio fisheye camera.
- Remove the line of 9 surface mount resistors from adjacent to the PCC header. These are numbered R621, R622, R623, R624, R625, R626, R628, R629, and R630. This disables the Ethernet port and SD card.
- Remove resistor R308 to disable the Qtouch button.
- Solder on 0Ω resistors (0402 package, min 1/16W) across the 4 pads R205, R206, R207, and R208. This enables the PCC camera header.
- Solder a 2×10 pin male header to the PCC header.
Having done this, you are ready to connect the camera. For this, you need a custom adapter board. You can buy the board from Oshpark, or you will find the necessary files to create it in this Gitlab folder. Finally, you are ready to flash and test the ML model.

Preparing the code and toolchain
There are several suitable IDEs available for the SAM E54. These include Microchip’s own MPLAB® X and Atmel Studio 7. In this project, I will use MPLAB® X. The first step is to get hold of the required compiler and libraries. You can download the 32 bit compiler for the SAM E54 from Microchip’s website. You will need to install this compiler on your system and set the correct PATH variable. Now you need to download the relevant drivers and libraries for the evaluation kit. The easiest way to do this is to go to the Atmel START website. Click the CREATE NEW PROJECT button and enter SAM E54 in the filter box. This should bring up a screen like the following.
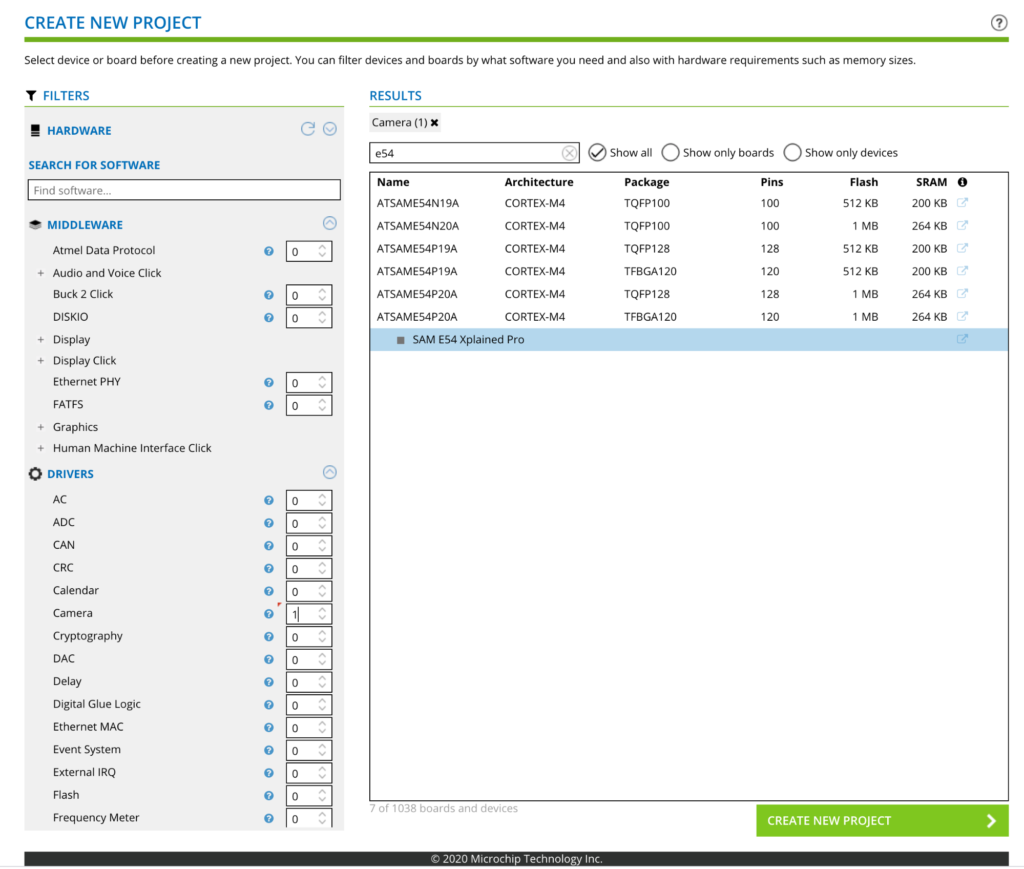
Select the SAM E54 Xplained Pro and set the number of cameras to 1 in the left side menu. Then click CREATE NEW PROJECT. From the next screen, click EXPORT PROJECT.
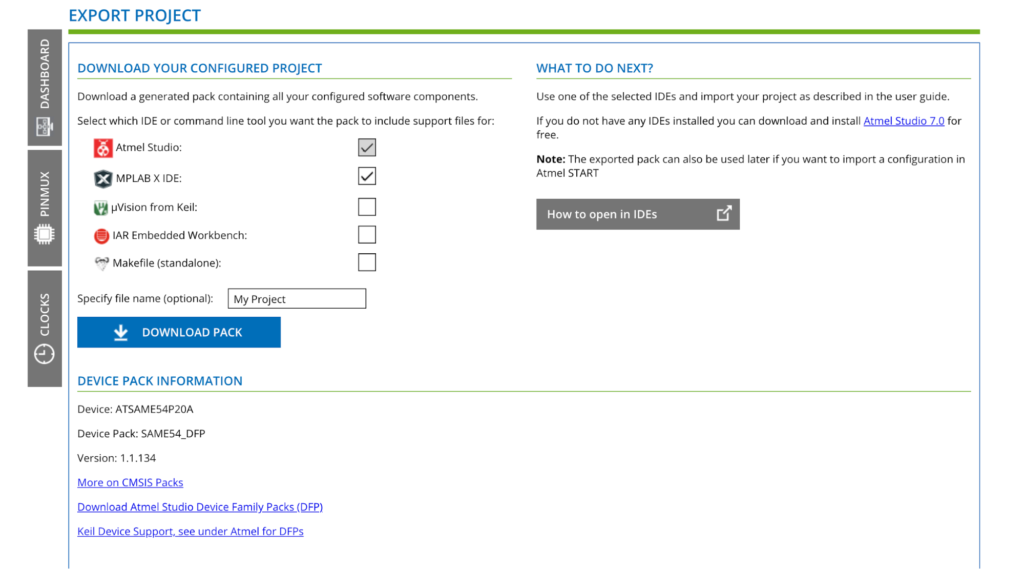
Make sure you select MPLAB X IDE and then download the pack.
Opening the project
Open MPLAB® X IDE and go to File → Import → START MPLAB Project. Locate the .atzip file you just downloaded and keep clicking Next until you reach the screen asking you to select a compiler. Make sure you select the 32 bit compiler you installed above and click Next. If you are happy with the location and project name, click Finish. You now have a blank project with the correct drivers and libraries for using the SAM E54 with a camera module.
The next step is to clone the source code for the image detection project and add this to the project. There are various ways to do this. I chose to clone the software onto my computer and then manually add the files to the relevant folder within the project. The source code doesn’t include the trained model data. It is just a skeleton. If you want to train an accurate model, you need to follow this tutorial from the TensorFlow Lite website. Once you have completely trained your model, you will have a new file called person_detect_model_data.cc. This should be added to your project.
Building and running the project
The final step is to connect your board to the computer via USB. Make sure you connect to the Debug port at the top right of the board.
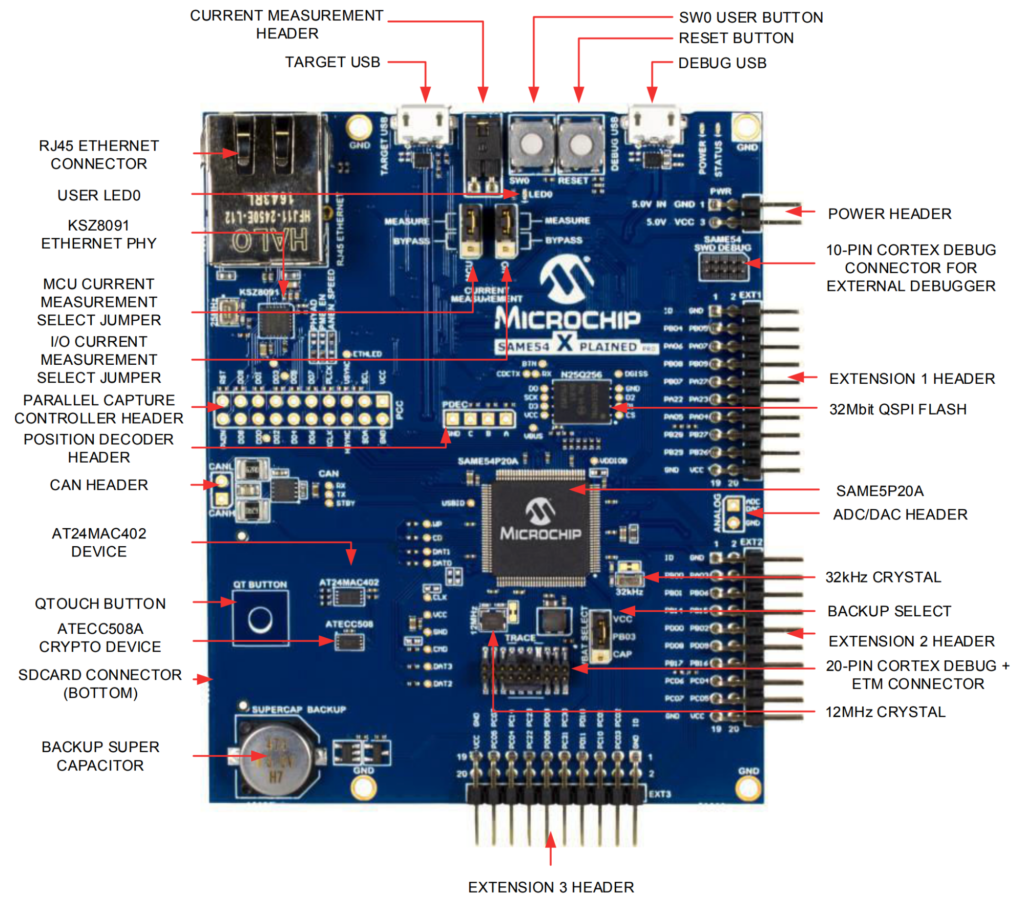
You are now ready to build the project. Ensure you set the SAM E54 Xplained as the debug target in the project Properties. Also choose the onboard EDBG debug header. Then click on the Build icon. The project should build successfully and download to the evaluation board.
The software you just built provides a simple neural network model that uses image recognition for person detection. That means, it monitors the camera feed and tries to detect when a person is in the field of view.
Power on the board, making sure no person is in the camera’s field of view. Wait for about 10s for the board to initialise. Now point the camera at a person. After a few seconds, the ML model should detect the person and the User LED will illuminate. Now move the camera to face away from the person. The User LED will switch off again.
This example is extremely simple. However, even this model has real life applications. For instance, being incorporated with a security camera to trigger recording when it detects a person in an empty room. If you want to extend this, you can try training a new model that can detect faces.
Conclusions
Image recognition is one of the most important use cases for ML at the network edge. This is because it powers applications such as real-time facial recognition and self-driving vehicles. Image recognition requires the use of complex ML structures, such as convolutional neural networks. However, as we have seen, you can now run these models on an MCU chip that costs substantially less than €10. In time, the capabilities of such MCUs will grow and grow. Next time, I will explore another powerful application of ML at the edge—voice control.
